There are two primary situations in which the ledger method may work for you. The first would be an existing slab upon which you plan to add a joist floor. Let’s say, for example, you were converting your garage into a new office. The garage is slab on grade and 8″ below the level of the rest of the house. You want to raise the finished floor in the future office to match the house and you’re doing it by building a joist system on top of the slab.
The second situation would be a remodeling project that required, for whatever reason, the removal of the existing sub-floor….or a room where headroom is at a premium and raising the floor to accommodate radiant tubing is not an option. Of course, we’re assuming here that access to the joists from below is impossible.
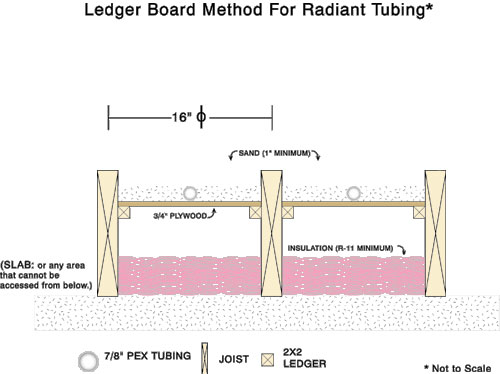
In both these situations, the joists are exposed and you’ll be installing the tubing from above. The procedure goes like this:
Drop down 3″ from the top of the joists and install ledger boards on the inside face of the joists (see illustration). Two by two strapping should be adequate. You’ll use these ledgers to create a “false floor” below the level of the joists using ¾” plywood. Of course, you’ll want to insulate below this “false floor” to prevent the heat from traveling downward. In the case of the garage slab, you’d probably want to use rigid foam, especially if there’s any chance that water could find its way under your joists. If water infiltration is not an issue, then fiberglass is fine.
Once the plywood is in place, attach the radiant tubing directly to the plywood using tubing straps. Thread the tubing through the joists just as you would with any joist system. Be certain you’ve sealed any cracks between the plywood and the joists, or any cracks between adjoining sheets of plywood. This is because the final step is to fill this cavity with sand. The sand will act as an excellent thermal mass, storing and diffusing heat. You don’t want the sand working its way through any cracks and ending up on the floor below.
So, with the tubing installed and sand poured up to the top of the joists, you can now install the finished floor in any manner you choose.
Note: Any time sand, concrete, or Gypcrete is added to an existing floor, always consult with a structural engineer to determine the load bearing capacity of your floor.
When Running Double the Normal Amount of Tubing Makes Sense
In situations with “fair” or “poor” insulation it may be necessary to run twice the normal amount of tubing. In other words, in the case of 7/8″ PEX (normally run 16″ on center) instead of running one length of tubing per joist bay, the installer will run two. The goal is to end up with the PEX installed 8″ on center, but without exceeding the bending radius of the tubing.
The solution is simple. Run the tubing as you normally would….one length per joist bay…then return to the beginning and repeat the process. Obviously, you’ll be drilling a second set of 1 1/2″ holes fairly close to the ones you’ve already drilled, then feeding your second batch of tubing through. For the second run, you’ll want to mimic the first run as closely as possible in terms of length, of course, because in effect you’re doing nothing more than adding additional circuits and all circuits must be equal in length.
With a ledger system, the installer also has the option of using a Sawzall to cut a radiused notch on the top of the joists, then running the tubing through the notch. Make sure the notch is rounded on the bottom, like a half-moon. This will eliminate the shear point caused by a standard V notch.
This technique makes the task of running double amounts of tubing much easier than trying to thread it through holes in the joists. Remember, the strength of a joist is primarily in the bottom half of the board, so notching won’t significantly weaken the joist. However, if you want, mending bars can be fastened across the notched area of each joist once the tubing has been installed.
When running the second batch of tubing, strive for an approximate 8″ on center spacing, but don’t worry if you have to cross over the first batch of tubing in some spots to achieve this. Attach the tubing to the sub-floor as you normally would using aluminum heat diffusion plates.
Of course, it goes without saying that improving the insulation value of the structure is normally preferable to doubling up on tubing. But sometimes that simply isn’t practical in older buildings. In addition, even modern, otherwise well insulated structures will sometimes require double tubing in certain zones. Because many people take advantage of spectacular views by designing large window walls and high cathedral ceilings, they create an equally spectacular heat loss in these areas. But, then again, nobody is suggesting that we should all live in high R-value caves either. Simply design the radiant system to accommodate the building’s heat loss and all the advantages of light, spaciousness, and comfort can be enjoyed.