Clean pipe and fittings well
Table of Contents
Any plumber will tell you that cleaning is the key to making solid, leak proof connections while soldering copper pipes. Copper oxidizes. Over time the brilliant copper sheen is replaced by a dull brown coating of oxidation. Removing this coating is essential to creating a perfect plumbing connection. Plumber’s sand cloth, steel wool, sandpaper, emery cloth, and sandblasting are all techniques used to remove the brown layer of oxidation and regain the shiny, easy to solder copper sheen.
Both the outside of the pipe and the inside of the fitting should be thoroughly cleaned… .even on new pipe and fittings. The cleaner the pipe, the better the connection.
Lightly flux both surfaces to be soldered
Soldering paste is then applied to the outside of the copper pipe and to the inside of the fitting to be soldered. There’s no need to slobber huge gobs of flux onto the copper. A light even coating is plenty. A flux brush or two should be purchased along with the tub of soldering paste. It’s not always easy, but try to keep the used brush clean by storing it between uses in a plastic bag.
Prep several connections
Plumbing is an exercise in getting from point A to point B as cleanly and easily as possible. It’s generally easiest to prepare several connections and solder them in one block operation. Often you can build a large part of your piping system and simply allow the cold connections to hold themselves together until you’re ready to gang solder the whole assembly. This has the advantage of allowing you to “test fit” everything together without the commitment of hard soldered connections that can be a pain to undo.
One notable exception to this procedure would be a large number of pipes and fittings hanging below a key vertical pipe. The shear weight of a large plumbing assembly below this one unsoldered connection guarantees an unsightly and annoying collapse of copper. The solution is to simply solder a joint or two and solve the problem by providing a solid connection to support the weight of the assembly below.
Sometimes, several of these “support” connections are made so the bulk of the plumbing configuration can be “dry fitted” together.
Applying the heat
When you’ve “dry fitted” several connections and your cleaned and fluxed fittings are ready for soldering, keep one important fact in mind, namely: solder flows toward the heat. The solder will even flow uphill.
The joint between the fitting and the pipe (i.e. the spot where the solder will ultimately flow into the fitting) is NOT where you want to point the flame of the torch. You want the solder to flow into and around the fitting, so heat toward the body of the fitting and incline the solder to follow it.
For example, if you’re soldering a copper elbow, the torch should be focused nearer to the crook of the elbow rather than on the edge of the fitting. Unless you’re in a confined space, try to move the torch around the fitting somewhat to maximize even heating. At the same time, gently touch the solder to the joint you’ll be soldering. At first, the joint will be too cool to melt the solder. Keep testing it every few seconds until the fitting is hot enough to bring the solder to the melting point. You want the heat from the hot fitting to melt the solder, not the flame from the torch. In fact, NEVER use the torch to melt the solder. When the fitting itself is hot enough to melt the solder, you can back off on the torch and allow the solder to feed into the joint.
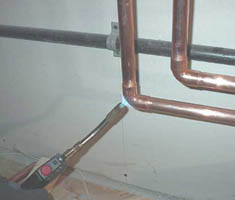
Try not to overheat the fitting. Doing so will only burn out the flux and make it harder to get a good, tight weld.
It is unnecessary to feed in so much solder that it’s dripping out the bottom of the fitting. A good rule of thumb is: use a length of solder equivalent to the size of the fitting you’re soldering. In other words, if you’re soldering a ¾” fitting, use three quarters of an inch worth of solder. A 1 ½” fitting will need a 1 ½” long piece of solder to fill the joint.
In general, it’s a good idea to allow the fitting or fittings to cool naturally. Spraying or dousing with water should be avoided.
Also, when soldering in confined spaces like joist cavities and stud walls, always respect the power of a propane torch. Protect any flammable surfaces by shielding them from the flame with a piece of sheet metal. Remember, the tongue of the soldering torch can reach well beyond the fitting being soldered. Good soldering technique requires more than a good, leak free connection. Be alert, organized, and always wear safety glasses.