Introduction
Contents
This system uses an efficient heat exchanger to separate the potable domestic water supply from the floor’s anti-freeze mixture. Only one heat source is used and the benefits of freeze protection can be fully utilized.
-
- One of the many creative ways that a heat exchanger may be used
-
- Very nice example of a 4 zone heat exchanger system installed by the home owner.
-
- Another example of a customer installed heat exchanger system
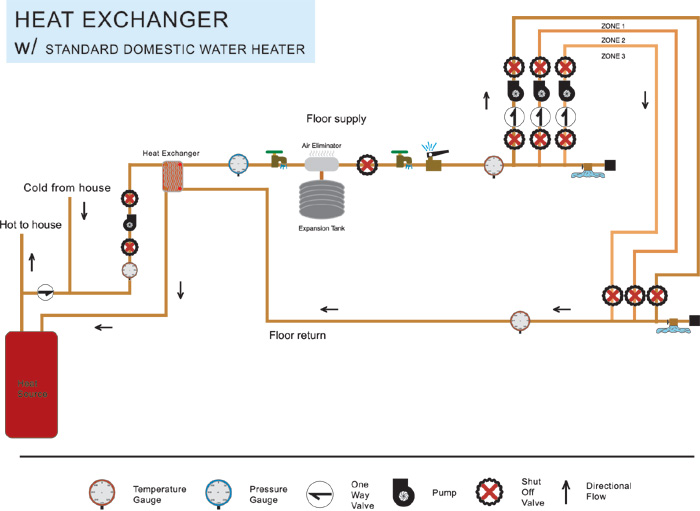
Heat exchange schematic with standard domestic water heater
However, always ask yourself, “Do I really need a heat exchanger?”
Most often heat exchangers are used for freeze protection, but another application would be a radiant system with one heat source that, for one reason or another, must be separated from the domestic water supply. This is rare. Even the need for freeze protection is often overrated because a radiant system stores so much heat in the mass of the home.

An example of a Radiant & baseboard / fan coil design.
A heat exchanger system using antifreeze can protect the radiant heating system down to -60 below zero. But the tradeoff is efficiency. Transferring heat from one medium to another (in this case, from potable water to antifreeze via the heat exchanger) costs BTU’s. The heat exchanger itself becomes warm and radiates into the surrounding air, though sometimes this heat helps warm a living space…even if that space is only a utility room. Quite often, the heat exchanger is insulated to minimize this effect. Nevertheless, any heat radiating from the heat exchanger is thermal energy that could have gone to your floors.
In addition, antifreeze as a heat transfer medium is inferior to plain water. Overall, a heat exchanger system is 10 to 20% less efficient than an open system.
Of course, water has a nasty habit of freezing at temperatures below 32 degrees and in some situations this reality far outweighs the negatives of using a heat exchanger. Heating a second home in a remote location prone to power outages would be a perfect profile for a heat exchanger system. In this scenario, you can drain the domestic water system if you leave for weeks in the winter and the antifreeze protects the heating system.
Heating a remote building may be another example. If you’re sending water through a buried insulated pipe above the frost line, antifreeze is essential.
Solar collectors almost always use antifreeze, so a heat exchanger is necessary in this application also.
The important point to understand is that most of the time heat exchangers are not essential in a radiant system.
EVERY heating unit that Radiant Floor company recommends and offers is “DESIGNED & RATED FOR SPACE HEATING”! These units are not your “typical” water heaters, so don’t let the compact size fool you! All of our heating units are manufactured to an industry standard of quality and reliability.
These highly efficient heaters are built with Radiant heating in mind. We offer units that will heat both your Radiant (space heating) and domestic hot water.
Regardless of which radiant heating system you choose, be it Open, Closed Or heat exchanger, or type of fuel source you require, Propane, Natural gas, Electric or Oil,…Radiant Floor company has you covered!!!
COMBI/COMBINATION SYSTEM:
The “COMBI OR COMBINATION” (Navien) system (below) is a closed system that will supply both space heating and domestic hot water. This system utilizes an integrated/built in heat exchanger to separate the potable domestic water supply from the floor’s water and or anti-freeze mixture, One liquid heats the other and the two never come in contact, Therefore only one heat source is needed.

Using an On-Demand Water Heater with a Heat Exchanger System
-
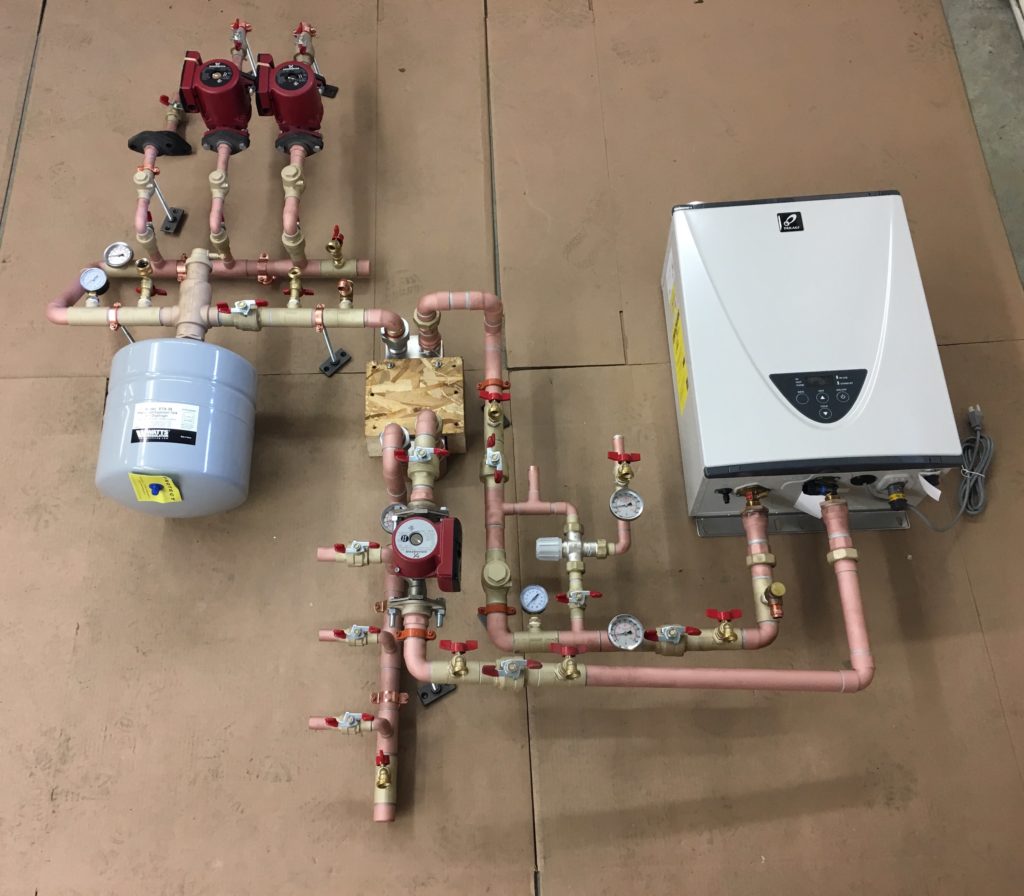
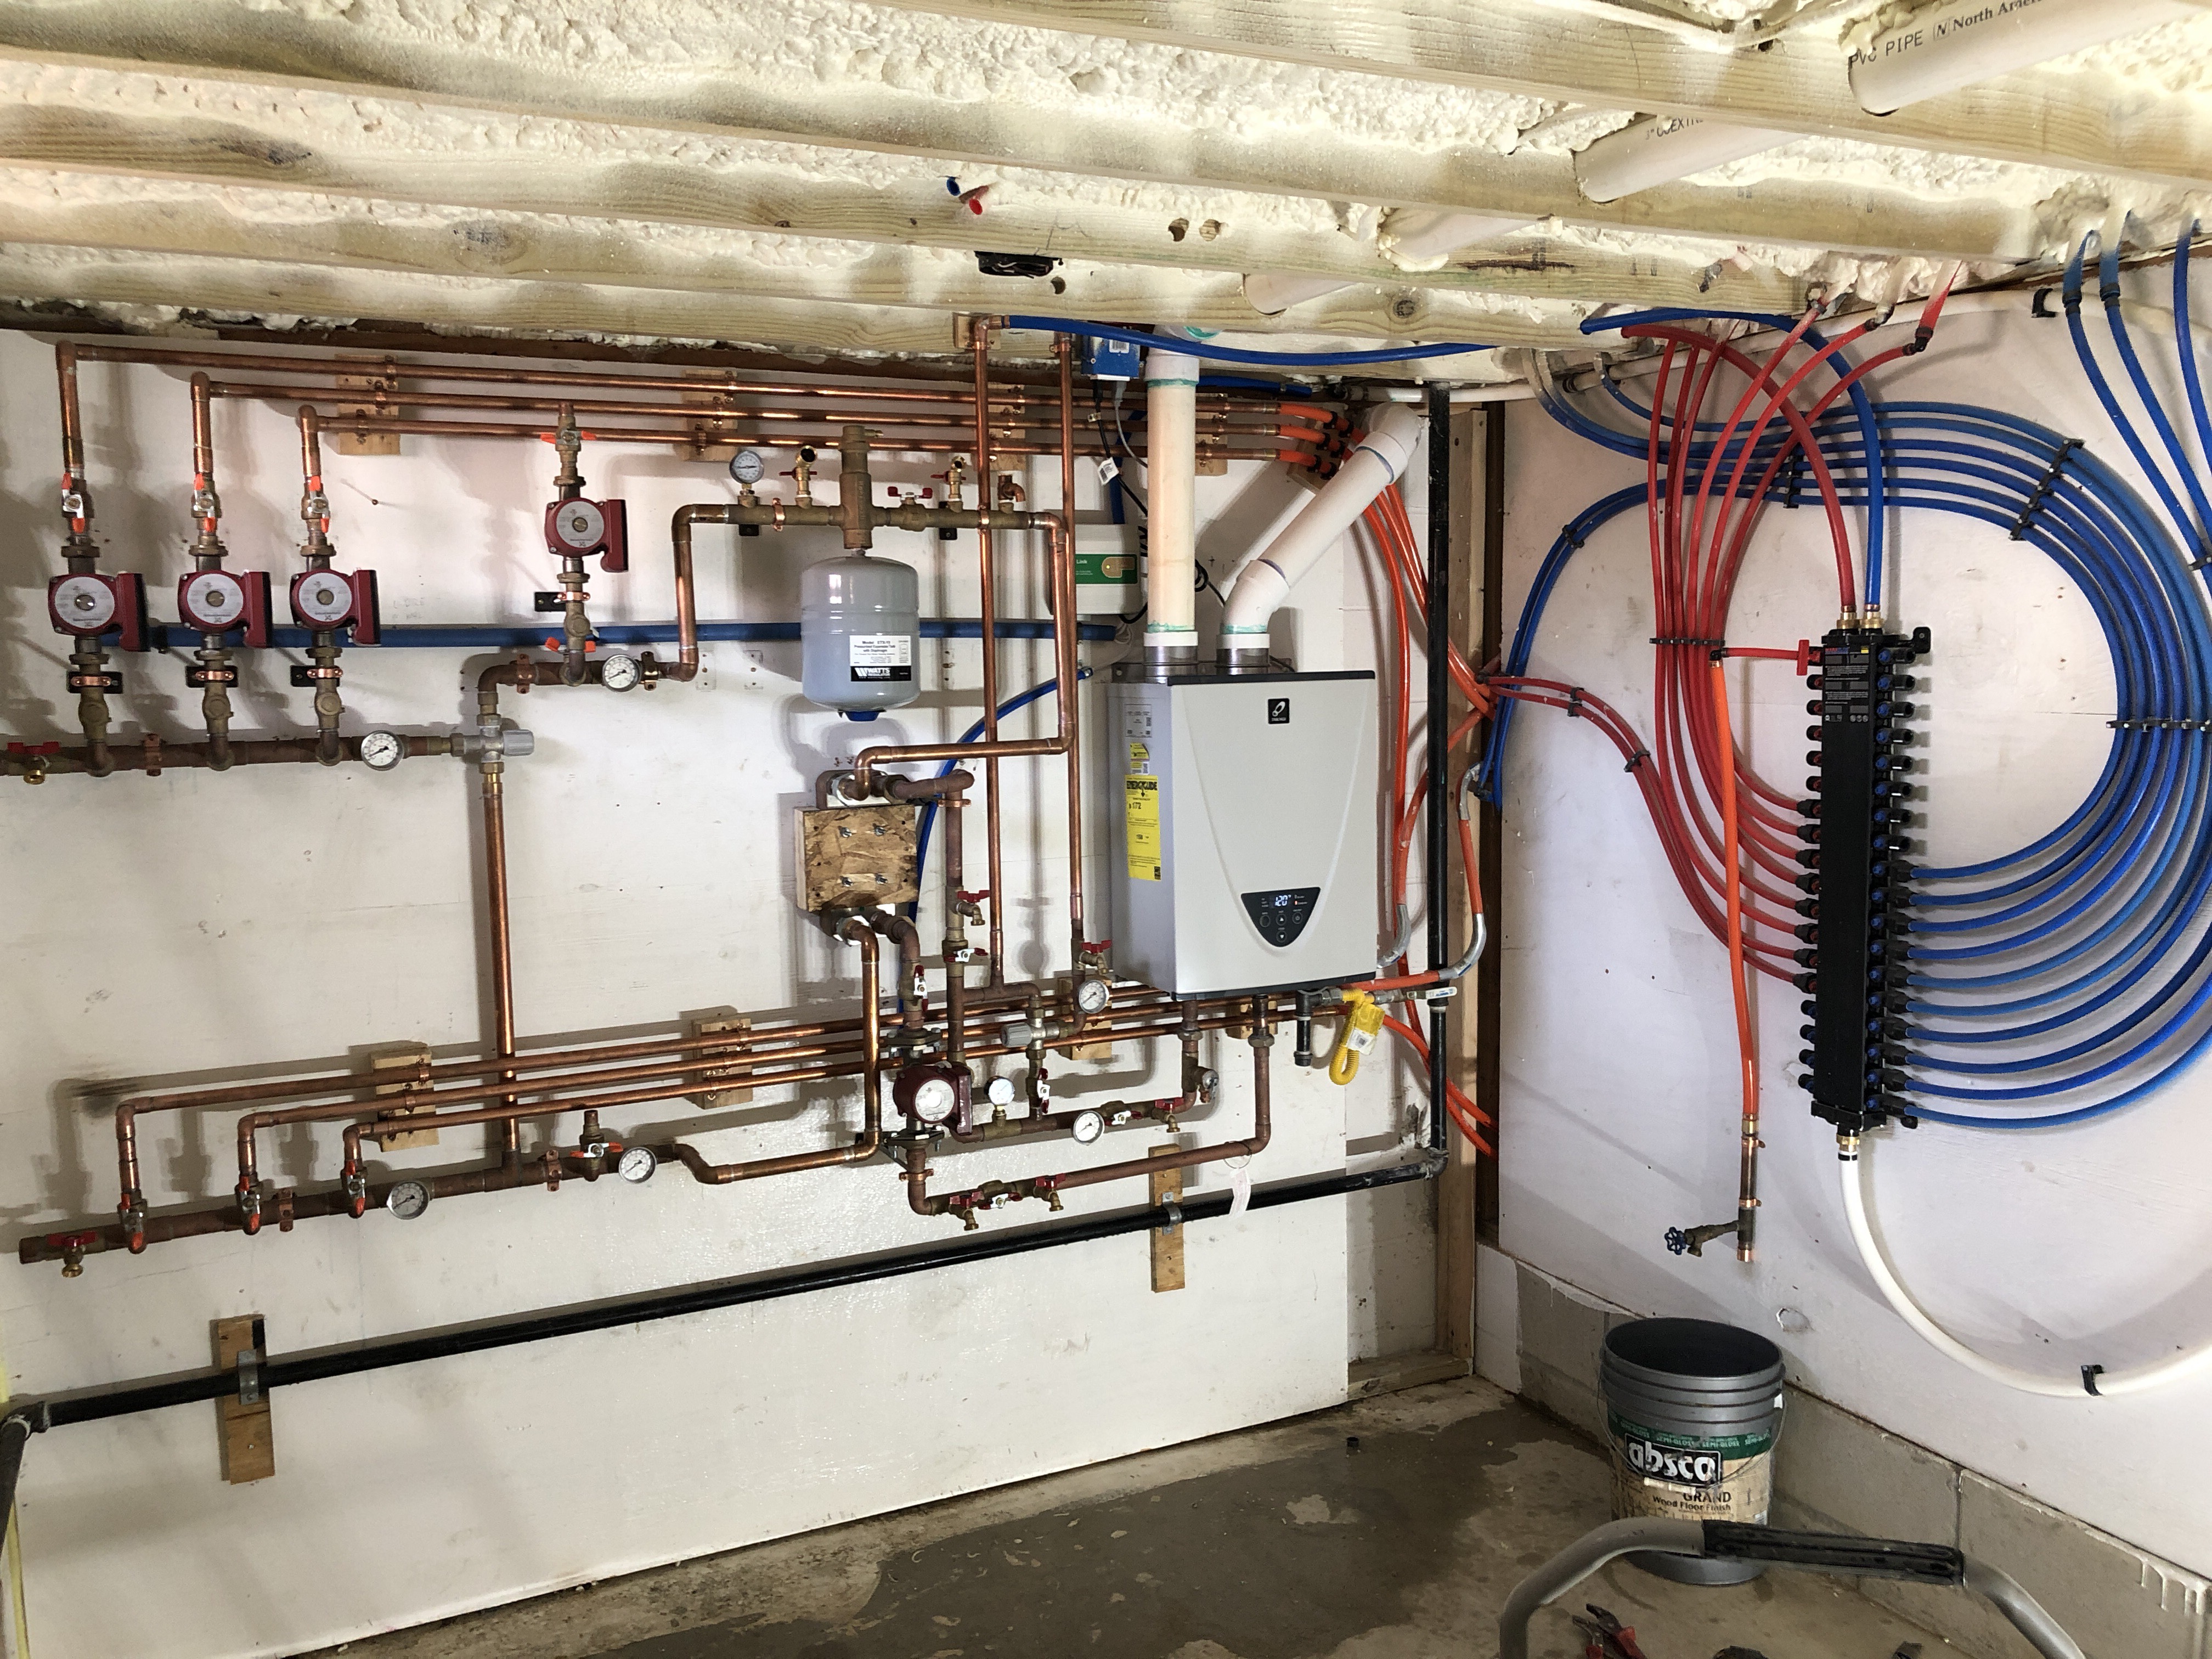
- Multi-zone heat exchange system using an on demand water heater
-

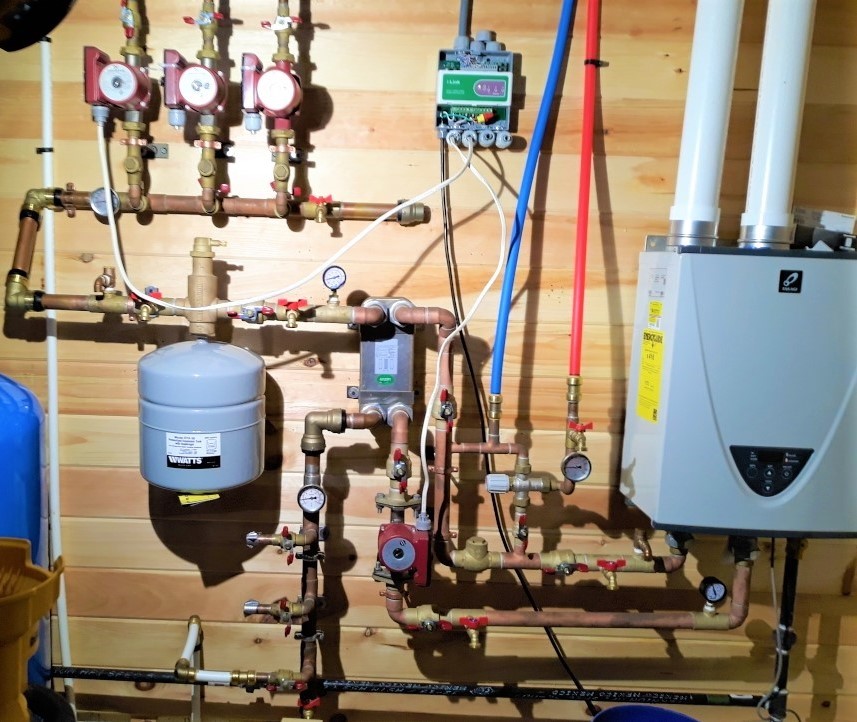
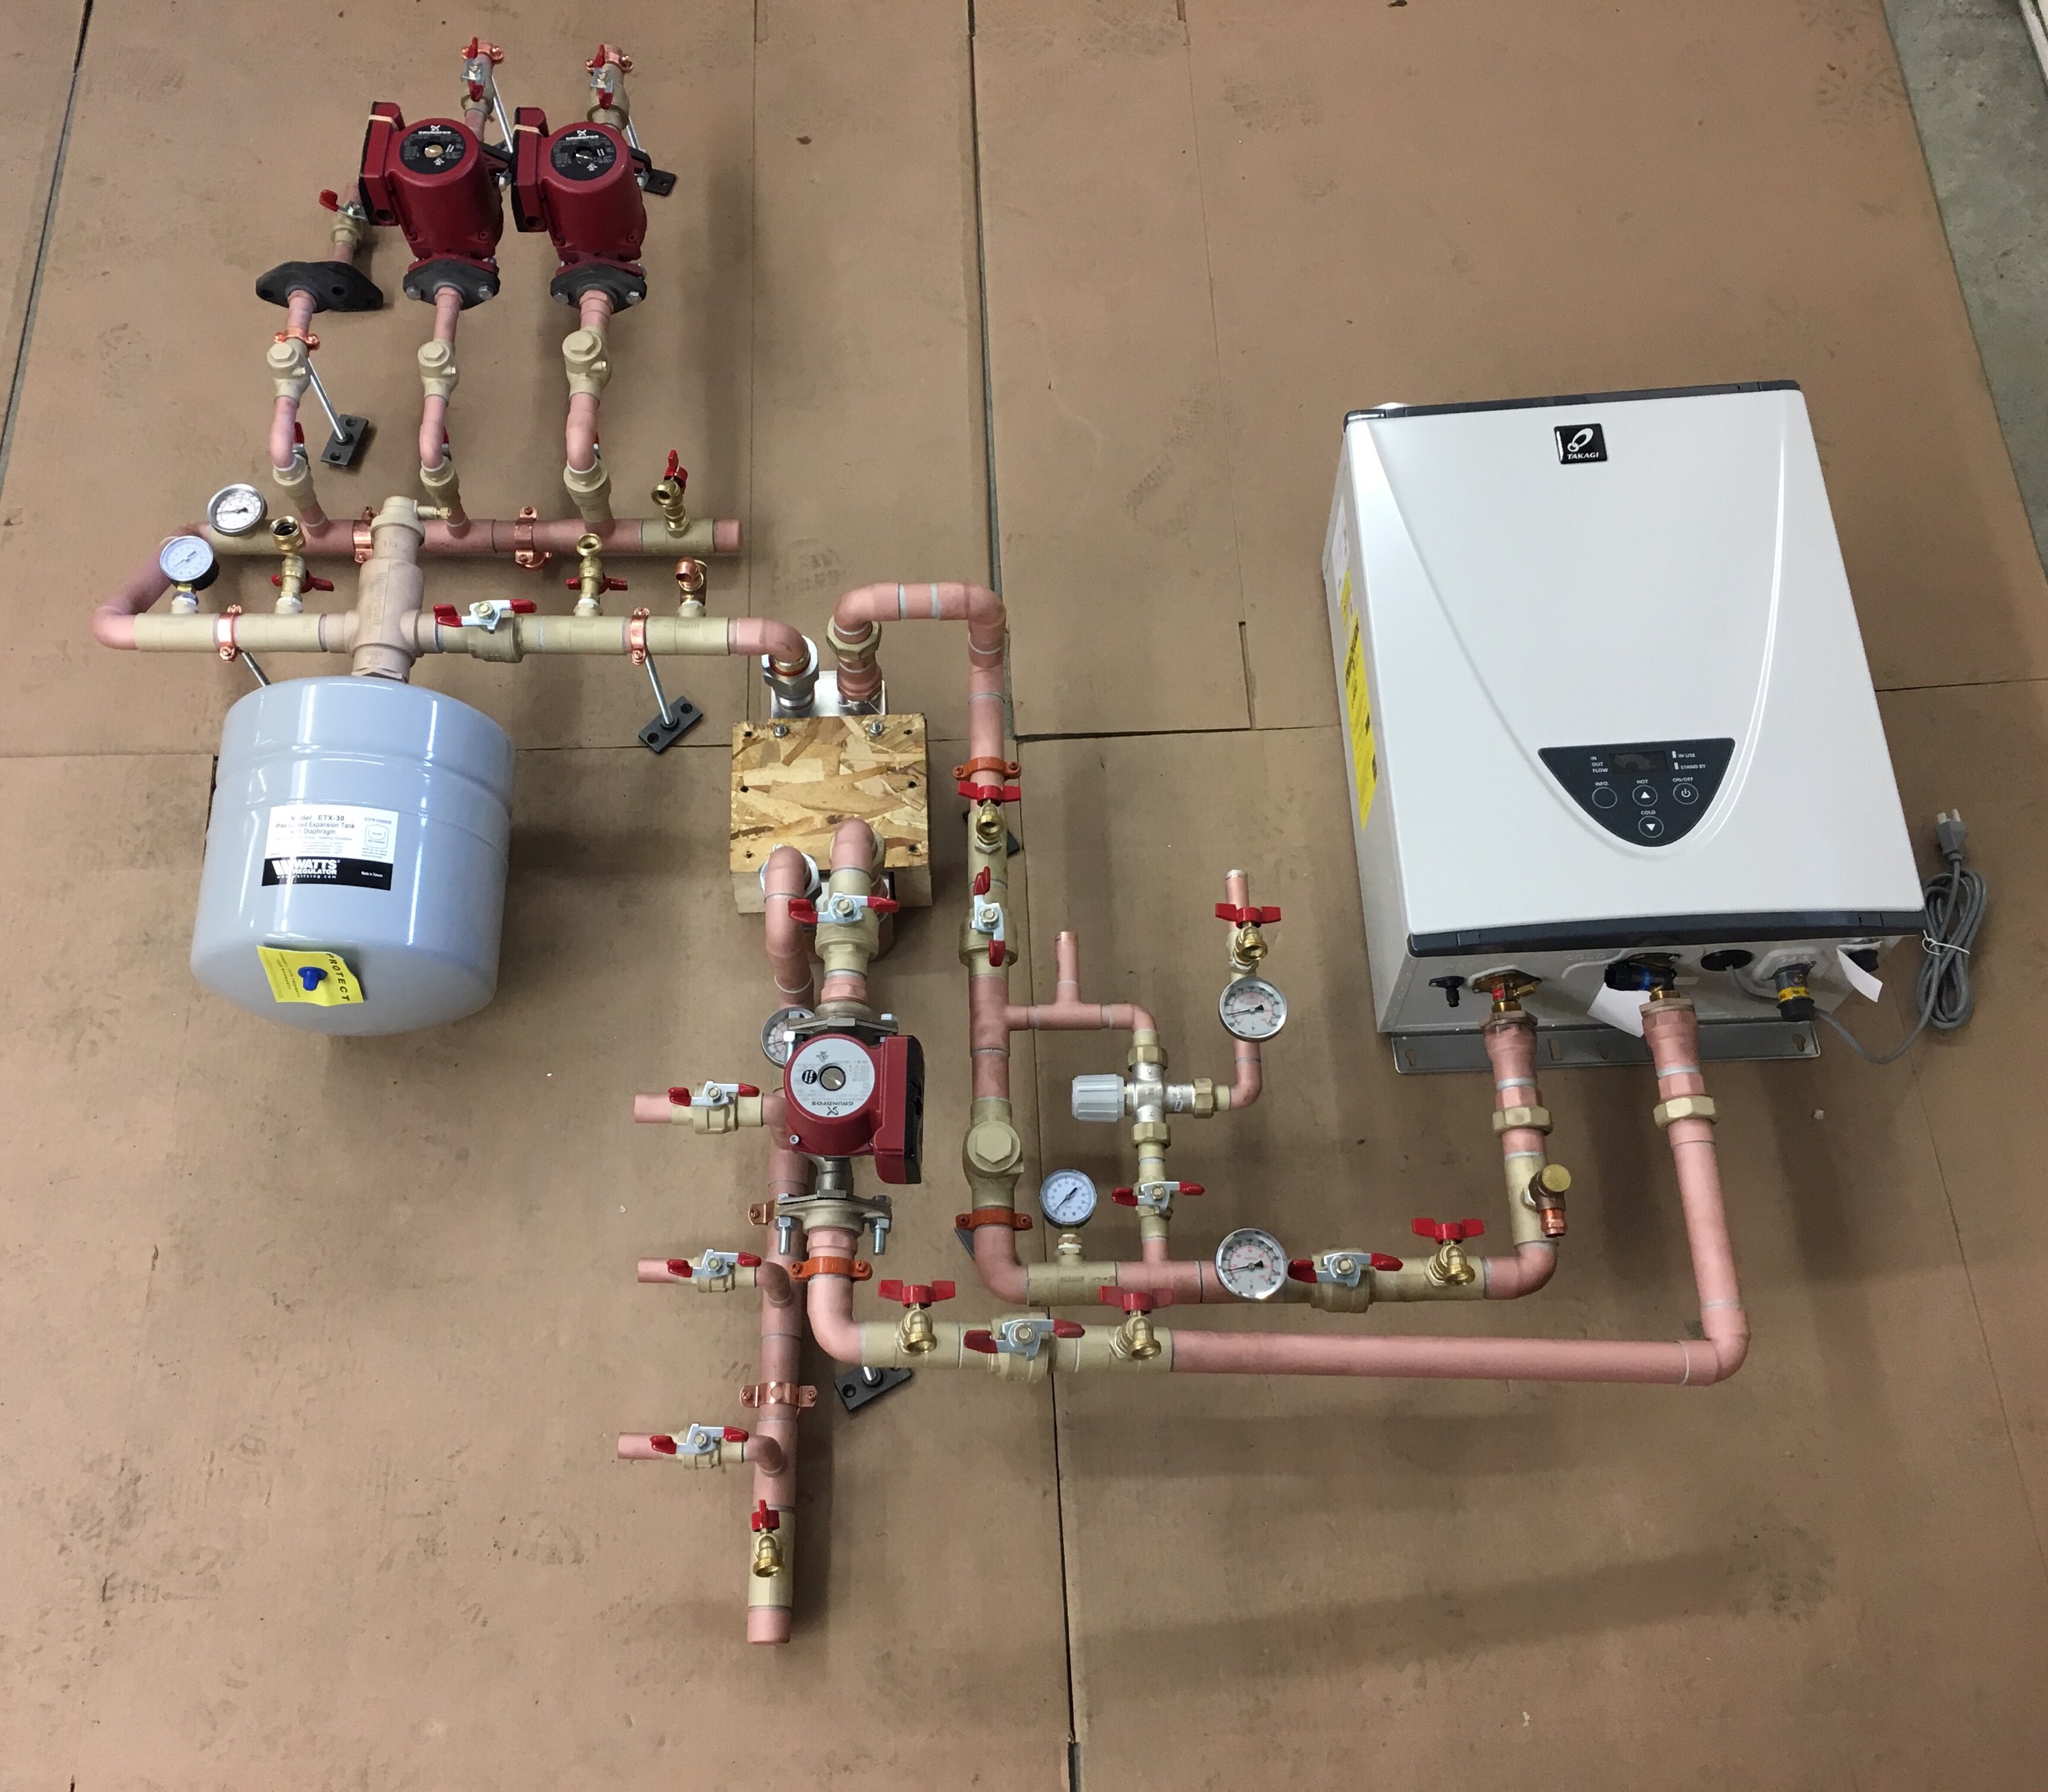
- Single zone heat exchange system with an on demand water heater
-
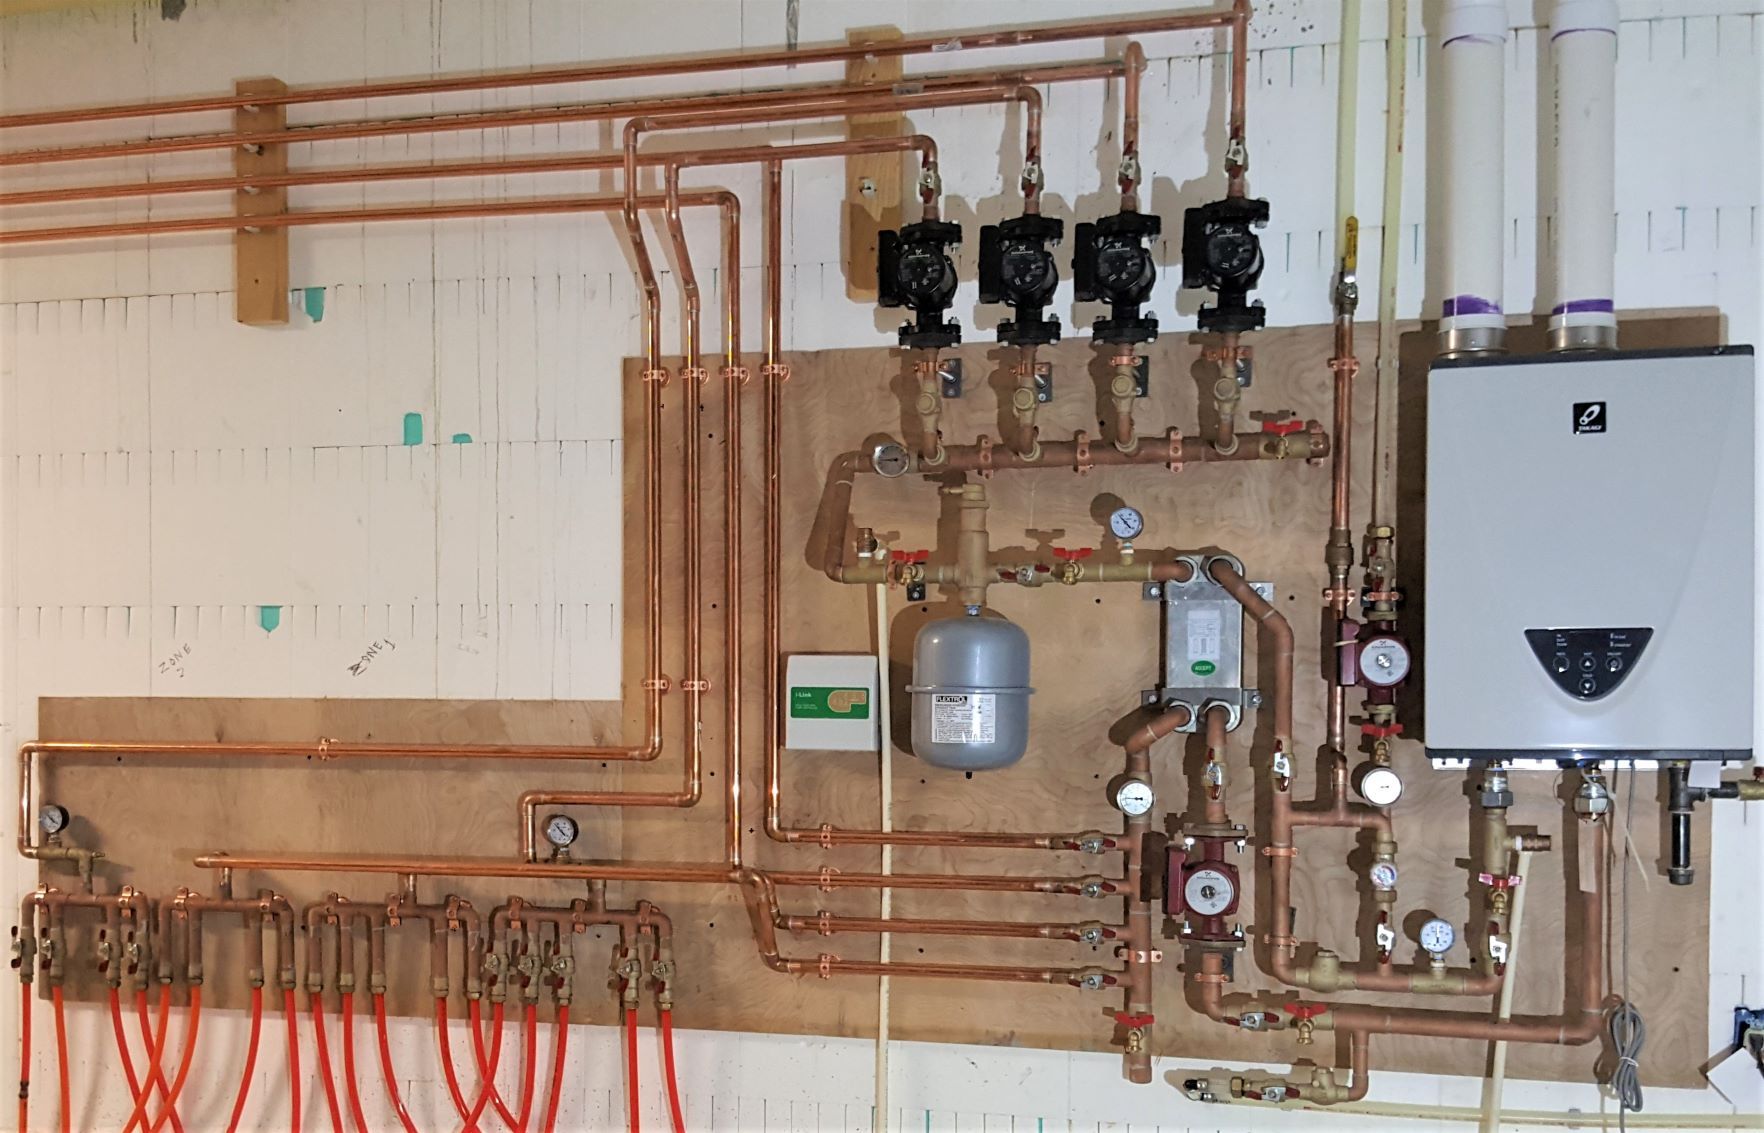
- An oil fired multi-zone Heat Exchanger system ~ heating a Radiant with baseboard combination system, as well as domestic hot water, separated by way of the heat exchanger.

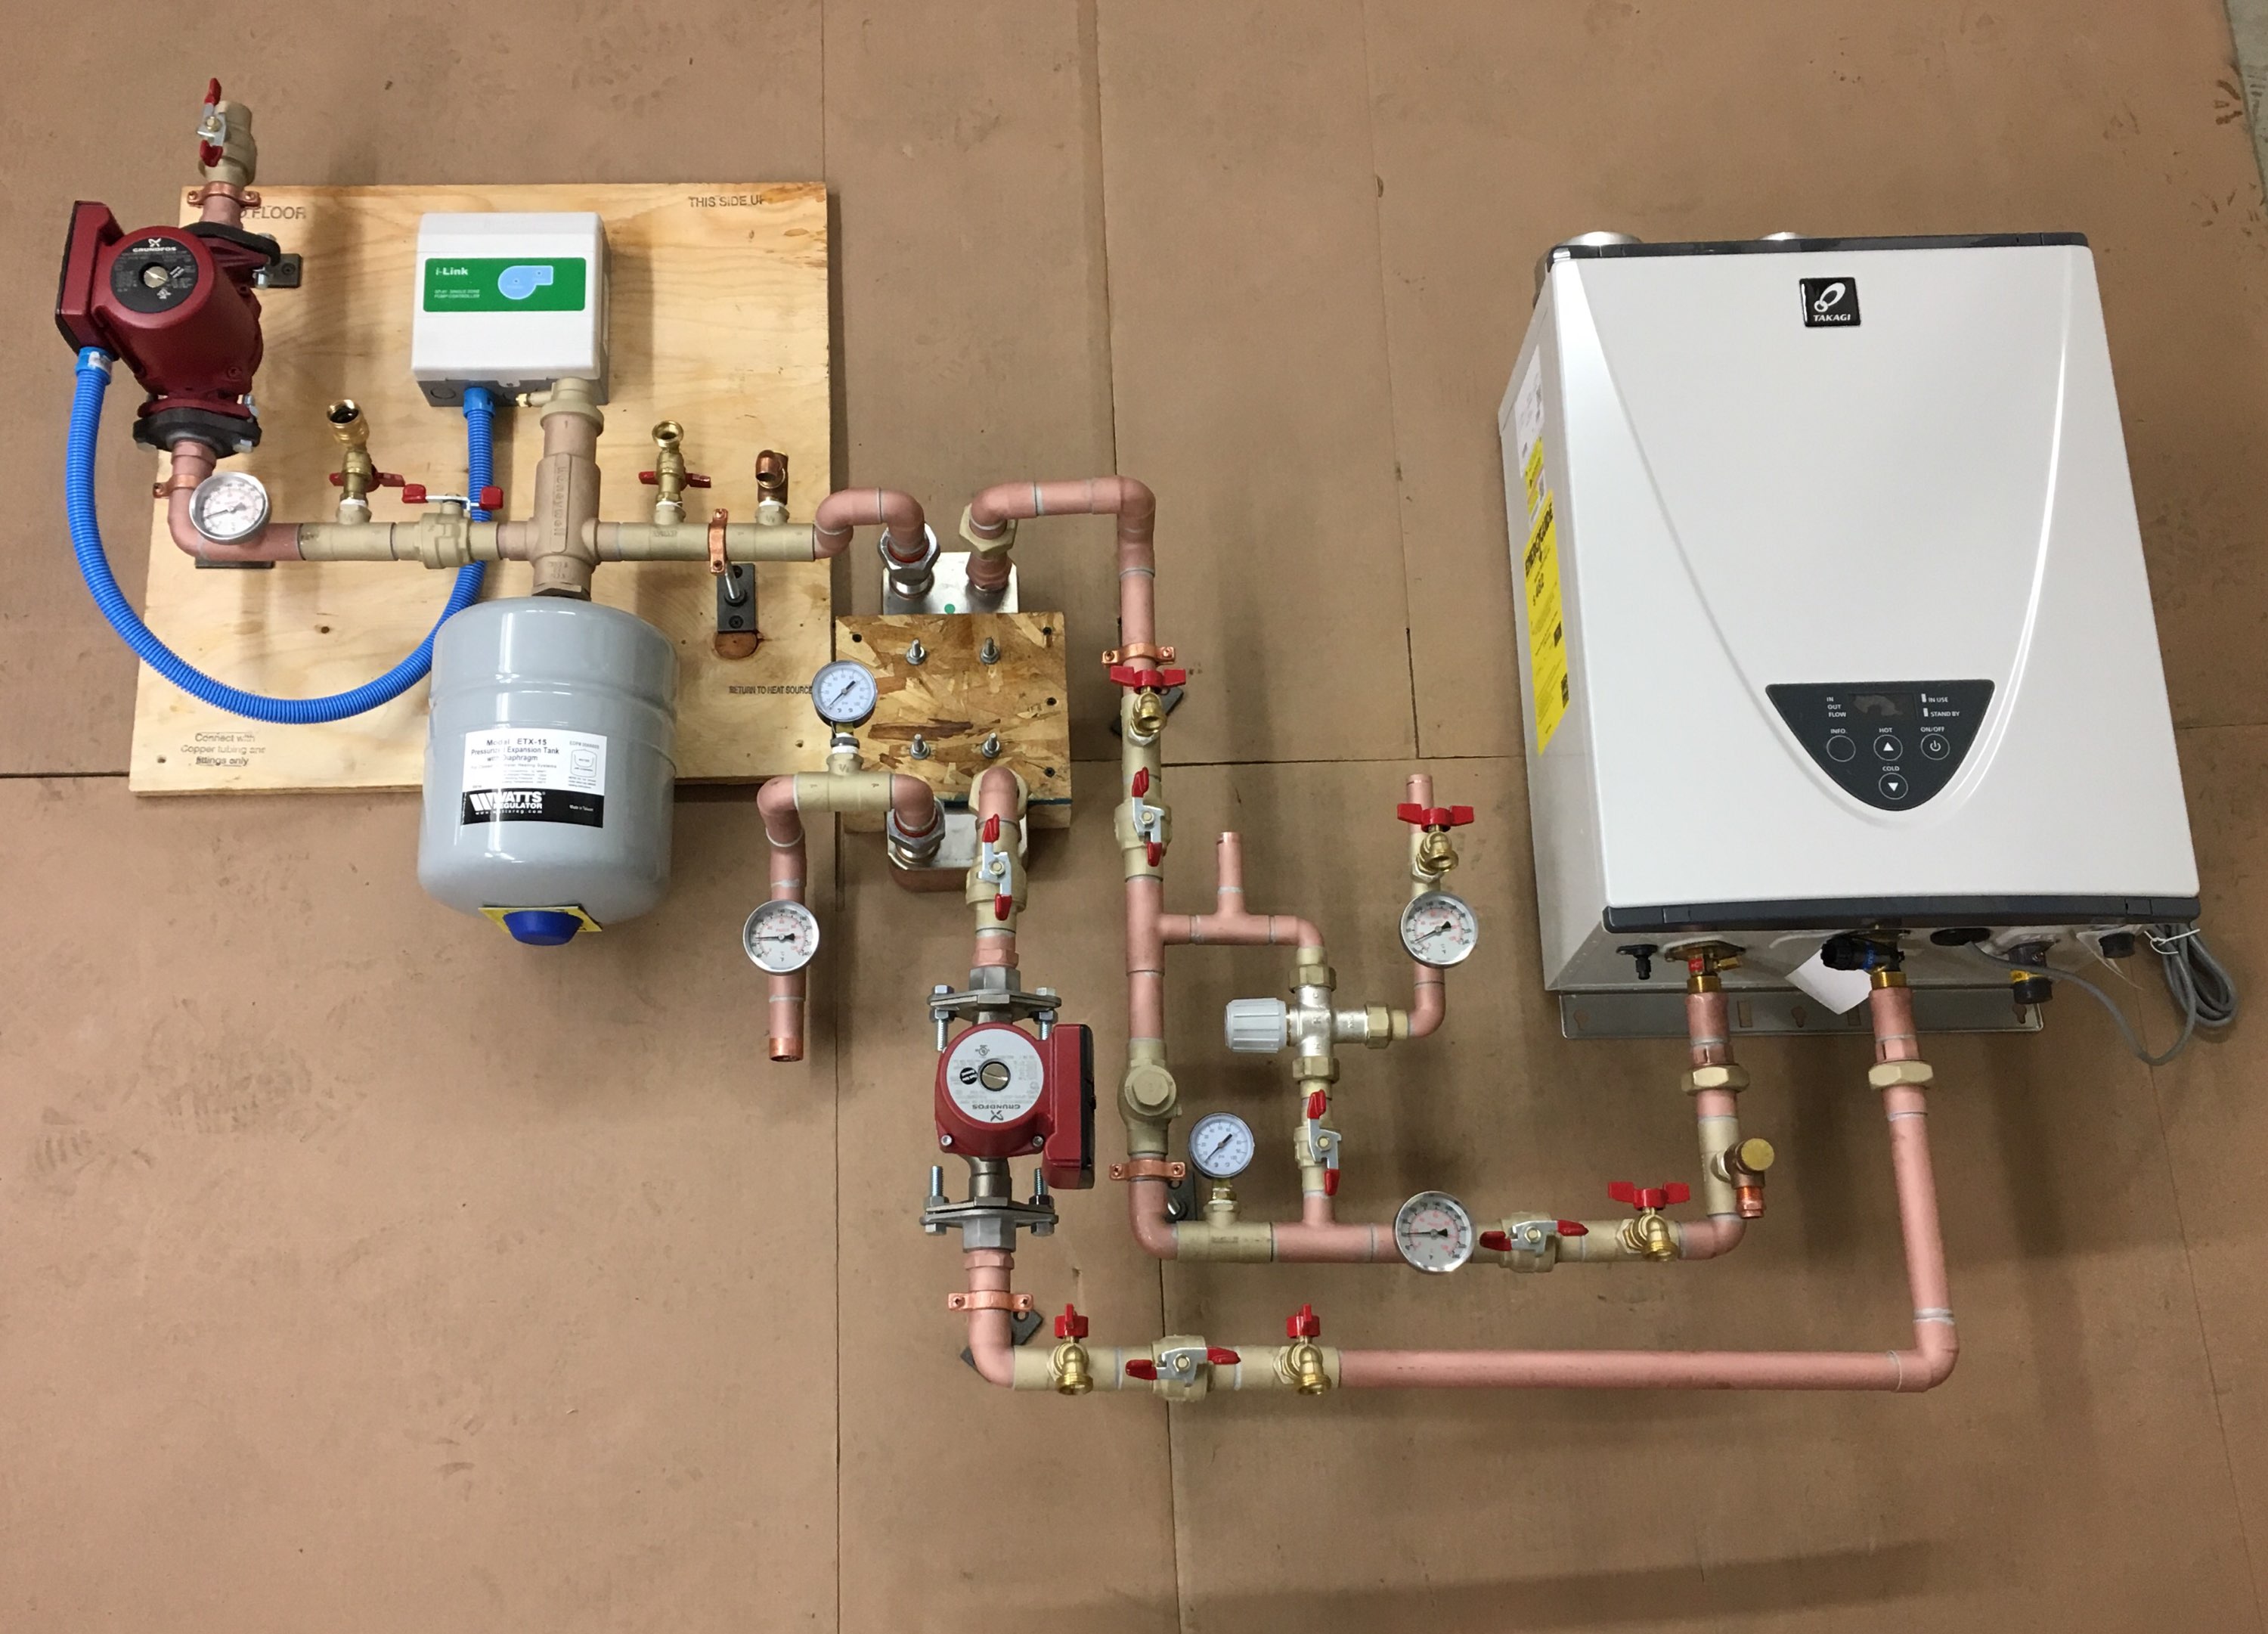
With this pre-assembled heat exchanger plumbing package (photo above, schematic below), the on-demand water heater can provide both space heating (using anti-freeze) and domestic hot (potable) water.
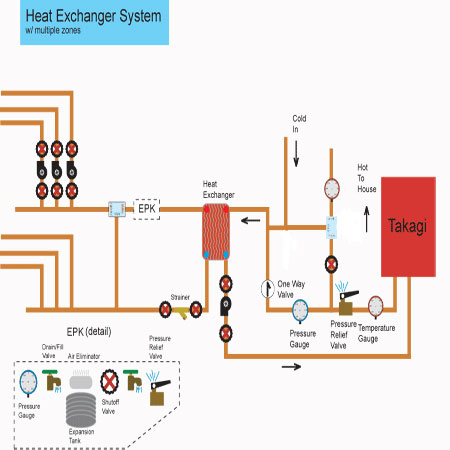
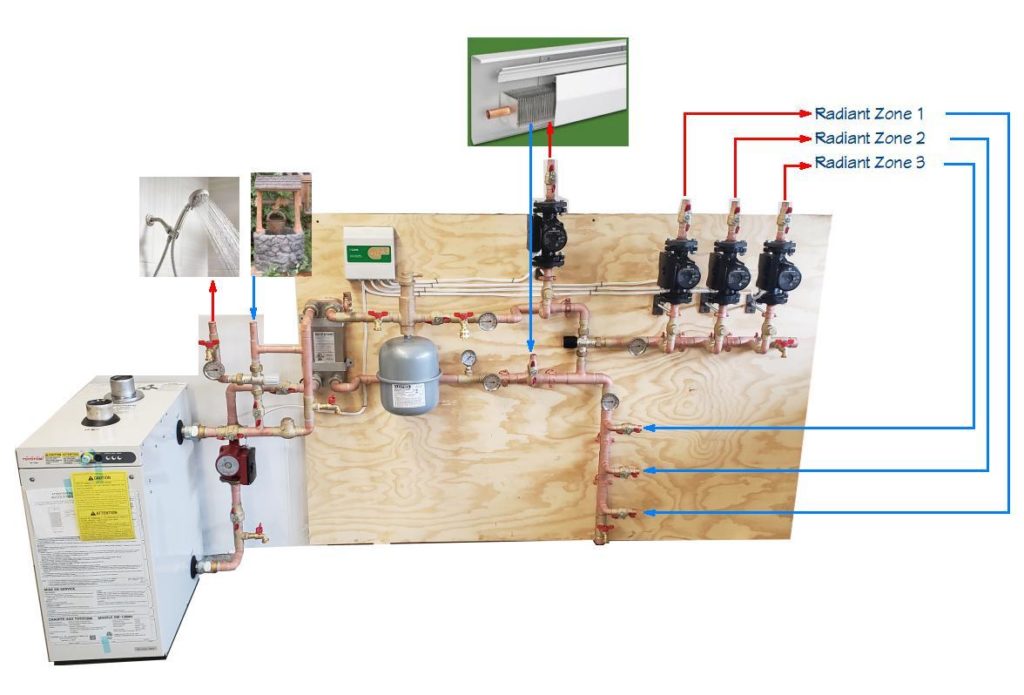
Heat Exchanger System with Multiple Zones
Cut a flat plate heat exchanger in half and you’ll find stacks of stainless steel plates. The two dissimilar fluids (normally water on one side, antifreeze on the other) flow between alternating plates. The fluids themselves never mingle, but heat flows easily from the hotter to the cooler fluid.
-
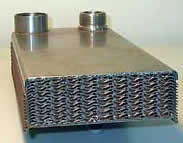
- Heat exchanger cut-away
-
- Heat exchanger plumbing
Mounting and Plumbing a Heat Exchanger
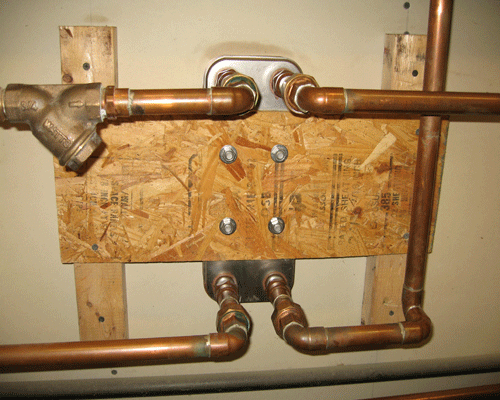
Heat exchanger mounted and plumbed
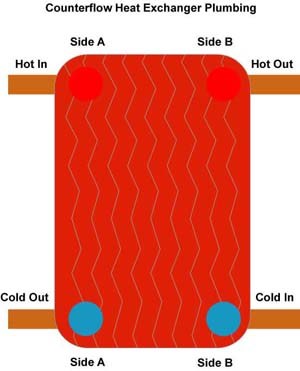
It is important to plumb a heat exchanger in “counterflow” rather than in “parallel”. Counterflow means that the hottest fluid entering Side A of the heat exchanger flows toward the coolest fluid entering from Side B on the opposite end of the heat exchanger (see illustration above). This maximizes heat transfer by forcing the coolest fluid to continuously flow toward the hottest part of the heat exchanger.
Plumbing in parallel would bring Side A “hot” and Side B “cold” into the same end of the heat exchanger and both would flow parallel down the length of the heat exchanger. Of course, this inefficient plumbing configuration will still transfer some heat from the hotter to the cooler fluid, but a full 40% of the heat exchanger’s capacity is lost.
Internal and External Heat Exchangers
Sometimes a heat exchanger isn’t a flat plate-type at all, but instead, is located INSIDE a storage tank. Not surprisingly, these are called “internal heat exchangers”. The advantages with the internal style are simplicity and efficiency. Simple because only one pump is needed to move the heat around, and efficient because although the external heat exchanger transfers heat from one medium to another VERY quickly, it also radiates heat to the surrounding air.
Internal heat exchangers aren’t as quick at transferring heat, but the heat has nowhere to go but to the surrounding water (which, one might argue, also leaks heat to the surrounding room — oh well, nothing is 100% efficient).
So it really comes down to application, that is, which type of heat exchanger is best suited for a given heating system. Some systems use both types, as can be seen below.
This is a plumbing schematic we drew up for a customer who wanted a wood boiler to heat a tank of water, which in turn provided both the home’s domestic hot water AND the radiant floor heat. Oh, and the radiant floor had to contain anti-freeze, i.e. it had to be “closed”.
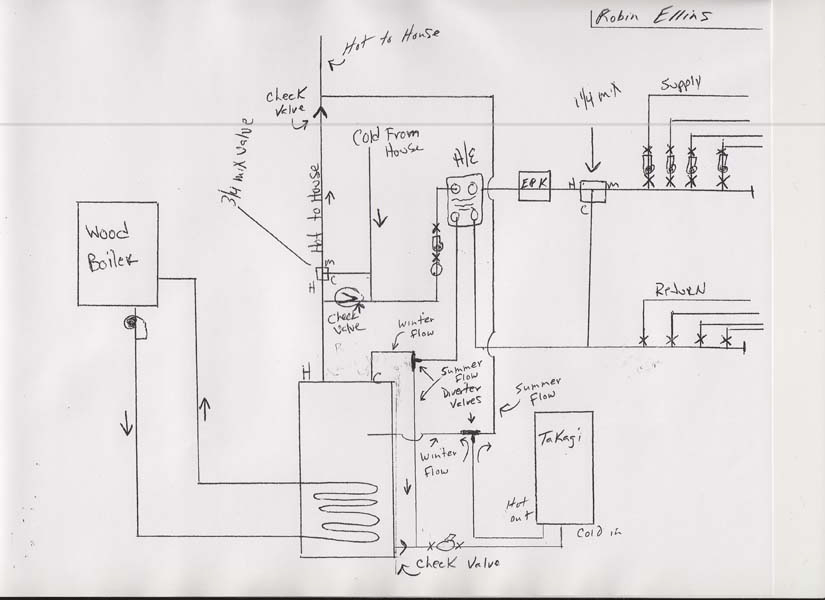
As you can see, this is a very complex heating system. Most radiant systems are far simpler. But, as an example of how vision can become reality, see the photo below of the finished installation.
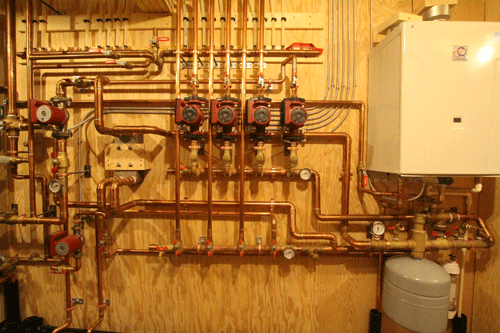
The storage tank with the internal heat exchanger is located beyond the frame of this photo, but it’s part of this extraordinary example of do-it-yourself craftsmanship. Our customer, Robin Ellins, proves that pride of ownership and attention to details, along with Radiant Floor Company’s pre-assembled systems, can result in a heating system that rivals even the most elaborate professional installation.
FILLING & PURGING THE DOMESTIC (water heater) SIDE OF YOUR HEAT EXCHANGER SYSTEM:
With a newly installed Radiant heating system, The first start up is most crucial, purging air from your system is a must. Air in your system is the WORST thing that can happen to any (Hydronic) Radiant heating system. Follow this link, https://www.radiantcompany.com/system/opensystem/#Filling_the_Open_System For Open system filing and purging details as well as On demand water heater filter cleaning / removing details. Turn off or disconnect the power supply from the water heater so that you’re not wasting hot water during this process.
Remember, just opening a domestic hot water fixture anywhere in the house will force water through the zone. However, opening the boiler drain valve to the right / above the mixing valve / thermometer is most convenient and offers best flow.

There’s not a lot maintenance for our Radiant heating systems but to clean a filter in the water heater and maintain system pressure. Follow this link, https://www.radiantcompany.com/details/fill/ and scroll down half the page for information on cleaning the filter & strainer for your Closed Radiant heating system.

FILLING & PURGING THE CLOSED (heating/zone) SYSTEM SIDE:
Filling and purging a Radiant heating system is a critical process! As air leaves a system the pressure will drop. When your Radiant heating system heats up, the pressure will increase, but when it cools, it will drop in pressure….. We recommend that you maintain at least 15 psi when the system is cold. When a heated system’s pressure is near 0,… and then cools,… it will create a NEGATIVE pressure… Thus creating a VACUUM, this will suck air into the system!
The fill hose needs to connect to the valve that feeds your zone pumps. Keep in mind that this valve could be left or right of the air eliminator, depending on your system’s configuration. The drain connection is the opposite valve. Be sure to CLOSE the ball valve that is between the two fill & drain valves. This forces the liquid through the zones, ensuring proper purging.

FILL FROM THE VALVE BETWEEN THE AIR ELIMINATOR AND THE ZONE PUMP,…PURGE FROM THE VALVE ON THE OPPOSITE SIDE OF THE AIR ELIMINATOR CLOSE THE BALL VALVE BETWEEN THEM.
If you are not using house pressure (from a hose etc.) then you may use a utility transfer pump, to pump the liquid into your system.
If you are you using antifreeze in your system, we recommend Propylene Glycol (not automotive Ethylene Glycol) antifreeze.
Determine how much antifreeze your system requires by adding the total amount of fluid in the tubing (2.7 gallons per 100 ft. of 7/8″ Pex) plus the volume of water in the Heat source (water heater or boiler).
Determine what percentage of anti-freeze to water mixture is recommended by the manufacture of the heat source. Ratios can vary. Some manufacturers recommend anywhere from 20%, 30 % anti-freeze, other’s 50%. The proper mix is also influenced by the degree of low temperature you wish to protect against. Some antifreeze comes “Pre-diluted” Be sure to check before purchasing.
“ALWAYS PRE-MIX YOUR ANTIFREEZE BEFORE PUMPING IT INTO YOUR SYSTEM”!
A utility transfer pump — NOT a sump pump is to be used when back flushing a unit and when filling and purging a Closed system utilizing an antifreeze mixture. We recommend a powerful utility pump like the Wayne EC-50, or the Wayne PC-4, or an equivalent pump like the Utilitech .5 HP Cast Iron Transfer Pump, all of which can generate up to 45-psi. The following link https://www.waynepumps.com/solution-center/utility-pumps-transfer/pc4 are specifications for the pump we talked about (Model # PC4).
Photos below illustrate the recommended 1/2 HP Utility transfer pump for filling and purging the closed Radiant system:
-
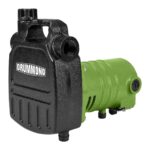
- 1/2 HP pump examples
Purging Procedure:
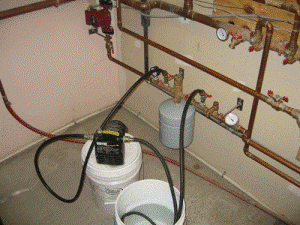

Be sure to fill and purge each loop within the zone separately, one at a time.
If you have three zones, for example, close the ball valves below the pumps for zones 2 and 3, and focus your water flow on Zone #1.
If Zone #1 has multiple circuits of tubing, each circuit will have a ball valve on the supply side of the loop manifold, close off all the circuits of Zone #1 except the first one and channel the water into that first circuit. When circuit #1 of Zone #1 has been purged, then close off circuit #1 and open circuit #2. Repeat this process for every circuit in every zone.

If you are not using house pressure (from a hose etc.) then you may use a utility transfer pump, to pump the liquid into your system.
We recommend Propylene Glycol (not automotive, Ethylene Glycol) antifreeze. Determine how much antifreeze your system requires by adding the total amount of fluid in the tubing (2.7 gallons per 100 ft. of 7/8″ Pex … 1.9 gallons per 100′ 3/4″ pex… 1.3 gallons per 100ft of 1/2″ Pex) plus the volume of water in the Heat source (water heater or boiler).
Determine what percentage of anti-freeze to water mixture is recommended by the manufacture of the heat source. Ratios can vary. Some manufacturers recommend anywhere from 20%, 30 % anti-freeze, other’s 50%. The proper mix is also influenced by the degree of low temperature you wish to protect against. Some antifreeze comes “Pre-diluted” Be sure to check before purchasing.
“ALWAYS PRE-MIX YOUR ANTIFREEZE BEFORE PUMPING IT INTO YOUR SYSTEM”!
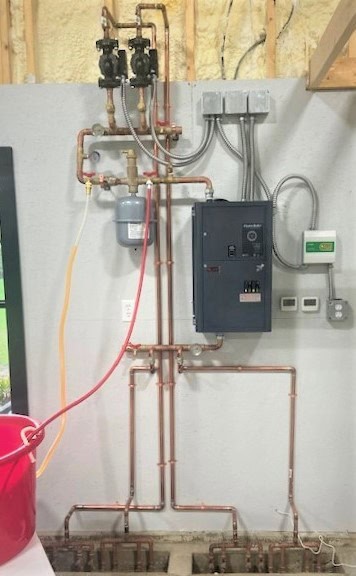
AUTOMATIC FILL VALVE:
Not every closed system uses an auto fill valve but this valve can be a good idea. Below is a typical placement examples of the “Automatic fill valve” (green valve below the expansion tank). Typically these valves are 1/2″ thread and are easily installed. These valves require a constant pressure water source and can be included with your closed system. All fittings and piping are non ferrous materials (stainless, brass and/or copper).


An Automatic fill valve supplies constant water pressure to a closed Radiant heating system at a maximum of 10 to 15 psi (see above). The Automatic fill valve, with pre-assembled shut off valve and stainless fittings are easily adaptable. Follow this link, https://www.tacocomfort.com/documents/FileLibrary/REV1_BFV_Instruction_Sheet_102-006_HIREZ_030119.pdf for auto fill valve installation & adjustment details/ instructions.
EXPANSION TANK: Your expansion tank is pre-charged and should not need any pressure. If your pressure is dropping below the 15 psi, it is an indication of air still trapped in your system,…. Air is the WORST thing that can happen to any (Hydronic) Radiant heating system. Follow this link, https://www.radiantcompany.com/details/fill/ for information on filling and purging your Closed Radiant heating system.

Expansion Tank Example