
Introduction
This approach utilizes a dedicated heat source for the radiant floor. The fluid in a closed system circulates around and around in a completely closed loop. There is no connection to the domestic water supply. The main advantage to this system is that, being closed, anti-freeze instead of water can be used as the heat transfer medium. The percentage of anti-freeze (Propylene Glycol) is determined by the type of heat source (on-demand heater or tank-type) and by the guidelines listed on the anti-freeze container.
EVERY heating unit that Radiant Floor company recommends and offers is “DESIGNED & RATED FOR SPACE HEATING”! These units are not your “typical” water heaters, so don’t let the compact size fool you! All of our heating units are manufactured to an industry standard of quality and reliability.
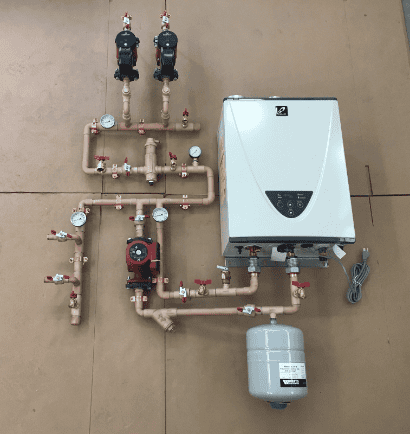
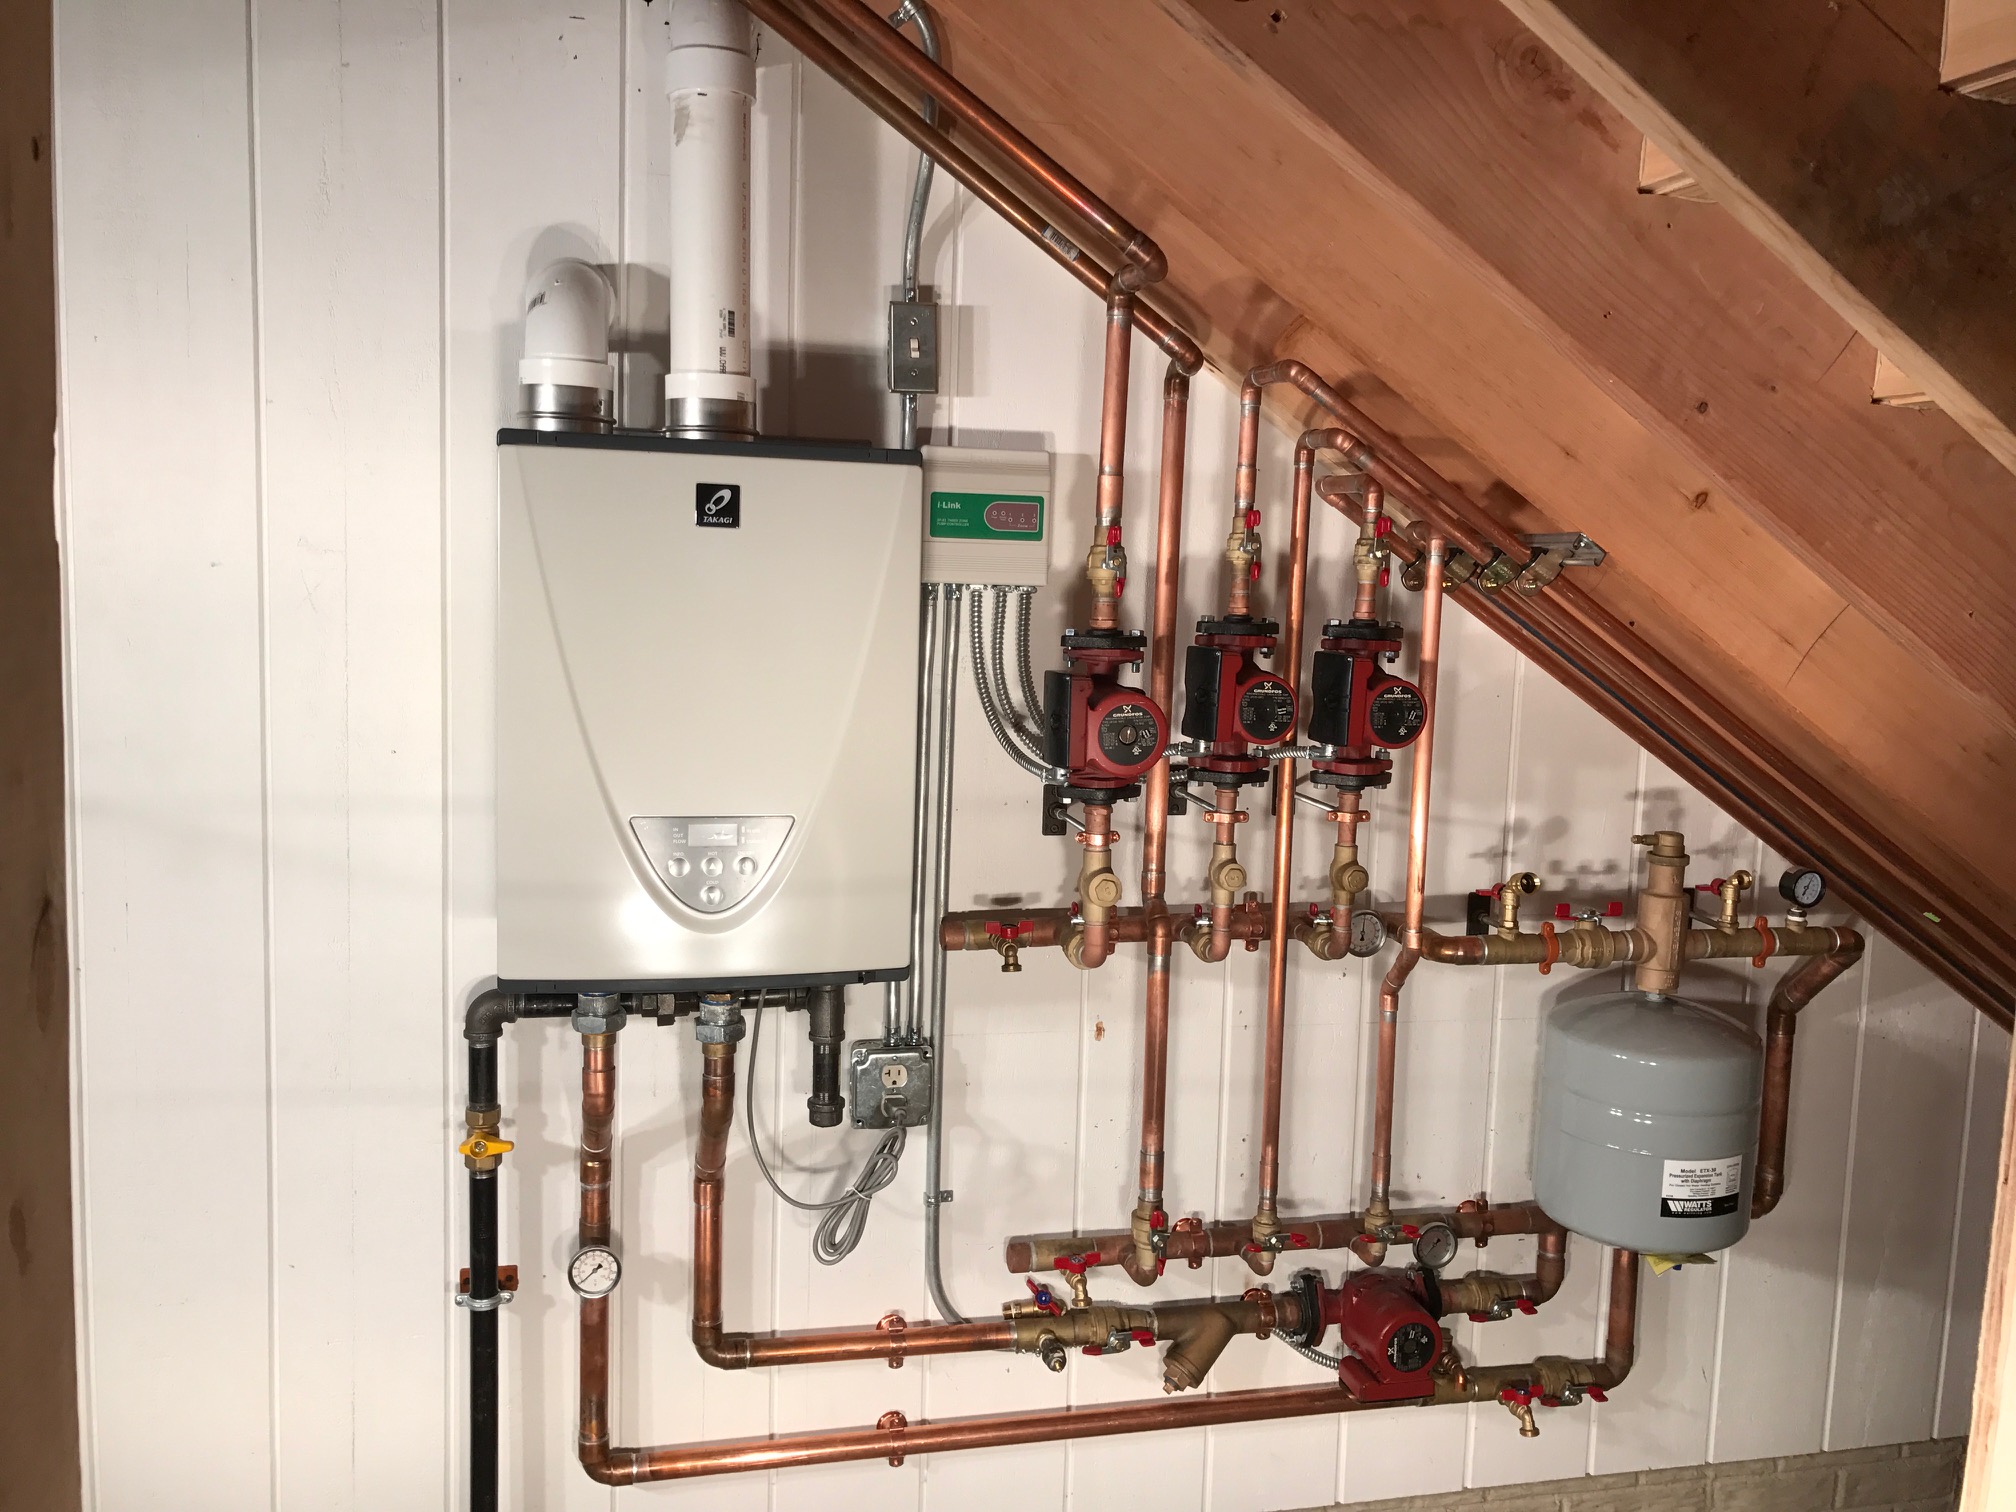
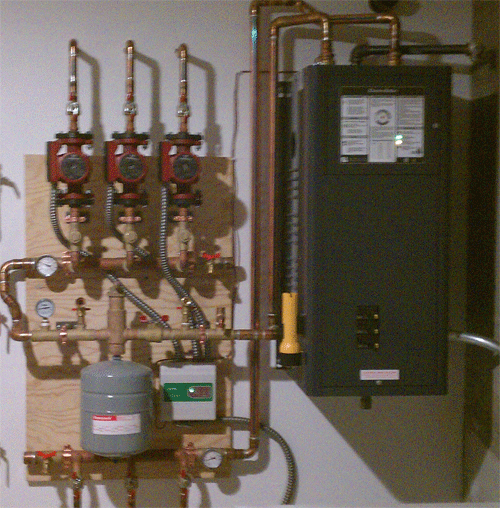
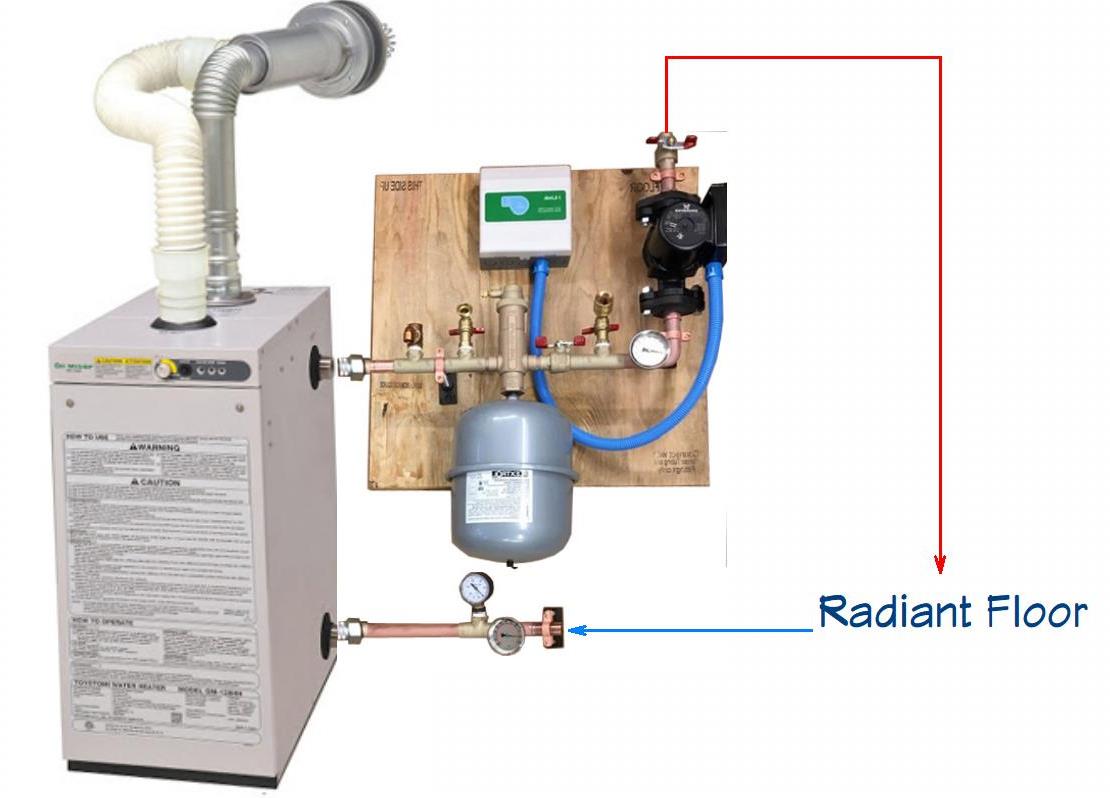
Closed systems are often used in second homes or primary residences in areas prone to long power outages. If freeze protection is an issue, than a closed system with anti-freeze is a good idea.
The down side is two heat sources. If you’re using a tank-type water heater, expect to waste significant heat energy (called “stand-by loss”) even when the burner is off and the unit is sitting idle between heating cycles. Tankless, on-demand water heaters don’t suffer from significant “stand-by loss”, but like tank-type heaters, they are still a “second” heater performing a dedicated task. Though granted, that dedicated task only costs you during the winter months.
Another consideration when deciding whether or not freeze protection is necessary would be simple economics – two water heaters are more costly to run than one high-efficiency unit. Then there’s the fact that anti-freeze doesn’t transfer heat as effectively as pure water, resulting in money spent for less heat, and of course the expense of the anti-freeze itself.
Still, none of the above negates the many valid reasons (protection, peace of mind, etc.) for using “closed” and “heat exchanger” systems.
Useful Guidelines
So, if your situation warrants it, what are some of the guidelines for operating closed systems?
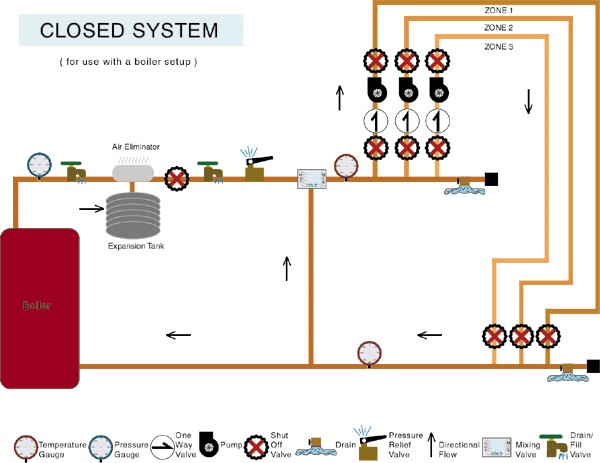
Well, because your radiant heating system is “closed” and therefore apart from the home’s continuously pressurized domestic hot water, consistent pressure must be maintained in one of two ways:
- By periodically adding pressurized fluid manually via a hose or pump. Or,
- By adding pressure automatically via an “auto-fill” valve, a device connected to the domestic cold water supply and plumbed into the radiant floor system (an “auto-fill” valve senses pressure drop in hydronic systems and automatically injects a squirt of water to raise the pressure back to the desired level).
But if the system is closed, how does the pressure drop in the first place?
The answer is in the nature of water itself — H2O. As fluid pumps around and around in the radiant floor system, it very slowly “gasses off” — those hydrogen and oxygen molecules – and this action creates tiny air bubbles that grow into larger bubbles and eventually become air pockets. Air pockets in your radiant tubing won’t transfer heat to the floor, and too much air in the tubing can even stop the circulating pump from moving ANY fluid to the radiant system.
That’s why “air eliminators” are plumbed into all closed and heat exchanger systems. And when that nuisance air is eliminated, the pressure in the radiant floor system drops. In fact, a neglected closed system can lose pressure down to zero, cool and contract the fluid between heating cycles, and actually create NEGATIVE pressure (a vacuum) that sucks MORE air into the system!
Not a good way to (try to) heat a radiant floor.
That’s why it’s so important to maintain approximately 15 pounds per square inch (psi) of pressure in a closed system. And also, to remember that air is the WORST thing that can happen to any hydronic radiant heating system.
Follow this link, https://www.radiantcompany.com/details/fill/ for information on filling and purging your Closed Radiant heating system. We recommend Propylene Glycol (not automotive, Ethylene Glycol) antifreeze.
Speaking of “air eliminators”, the cap on top of the device is closed when tightened clockwise – useful only for pressure testing the radiant system. Obviously, during normal operation, the cap must be open a few turns, or until daylight is visible through the slit in the cap.
System Volume
So, how much anti-freeze should you use in a radiant heating system?
The easy answer is: Read the worksheet, specific to your system, provided by Radiant Floor Company. We’ll happily do the calculation for you.
But, for those interested in the formula, the method is as follows:
- Add the total amount of fluid in the tubing (2.7 gallons per 100 ft. of 7/8″ PE-RT (or PEX), or, 1.9 gallons per 100′ 3/4″ PEX, or, 1.3 gallons per 100ft of 1/2″ PE-RT (or PEX).
- Add the volume of water in the heat source – for a tank-type water heater or boiler only because tankless water heaters store insignificant amounts of fluid.
- Determine the anti-freeze to water mixture recommended by the manufacture of the heat source. Ratios vary. Some manufacturers recommend 20% anti-freeze, some 30%, others 50%. The proper mix is also influenced by the degree of low temperature you wish to protect against. There’s a chart on the container that will indicate % of water to anti-freeze for, say, protection down to 5° F, or -10° F, -20° F, etc. Note: Some antifreeze comes “pre-diluted”. Be sure to check before purchasing, and if you’re buying “pure” propylene glycol, ALWAYS PRE-MIX the anti-freeze BEFORE pumping it into your system!
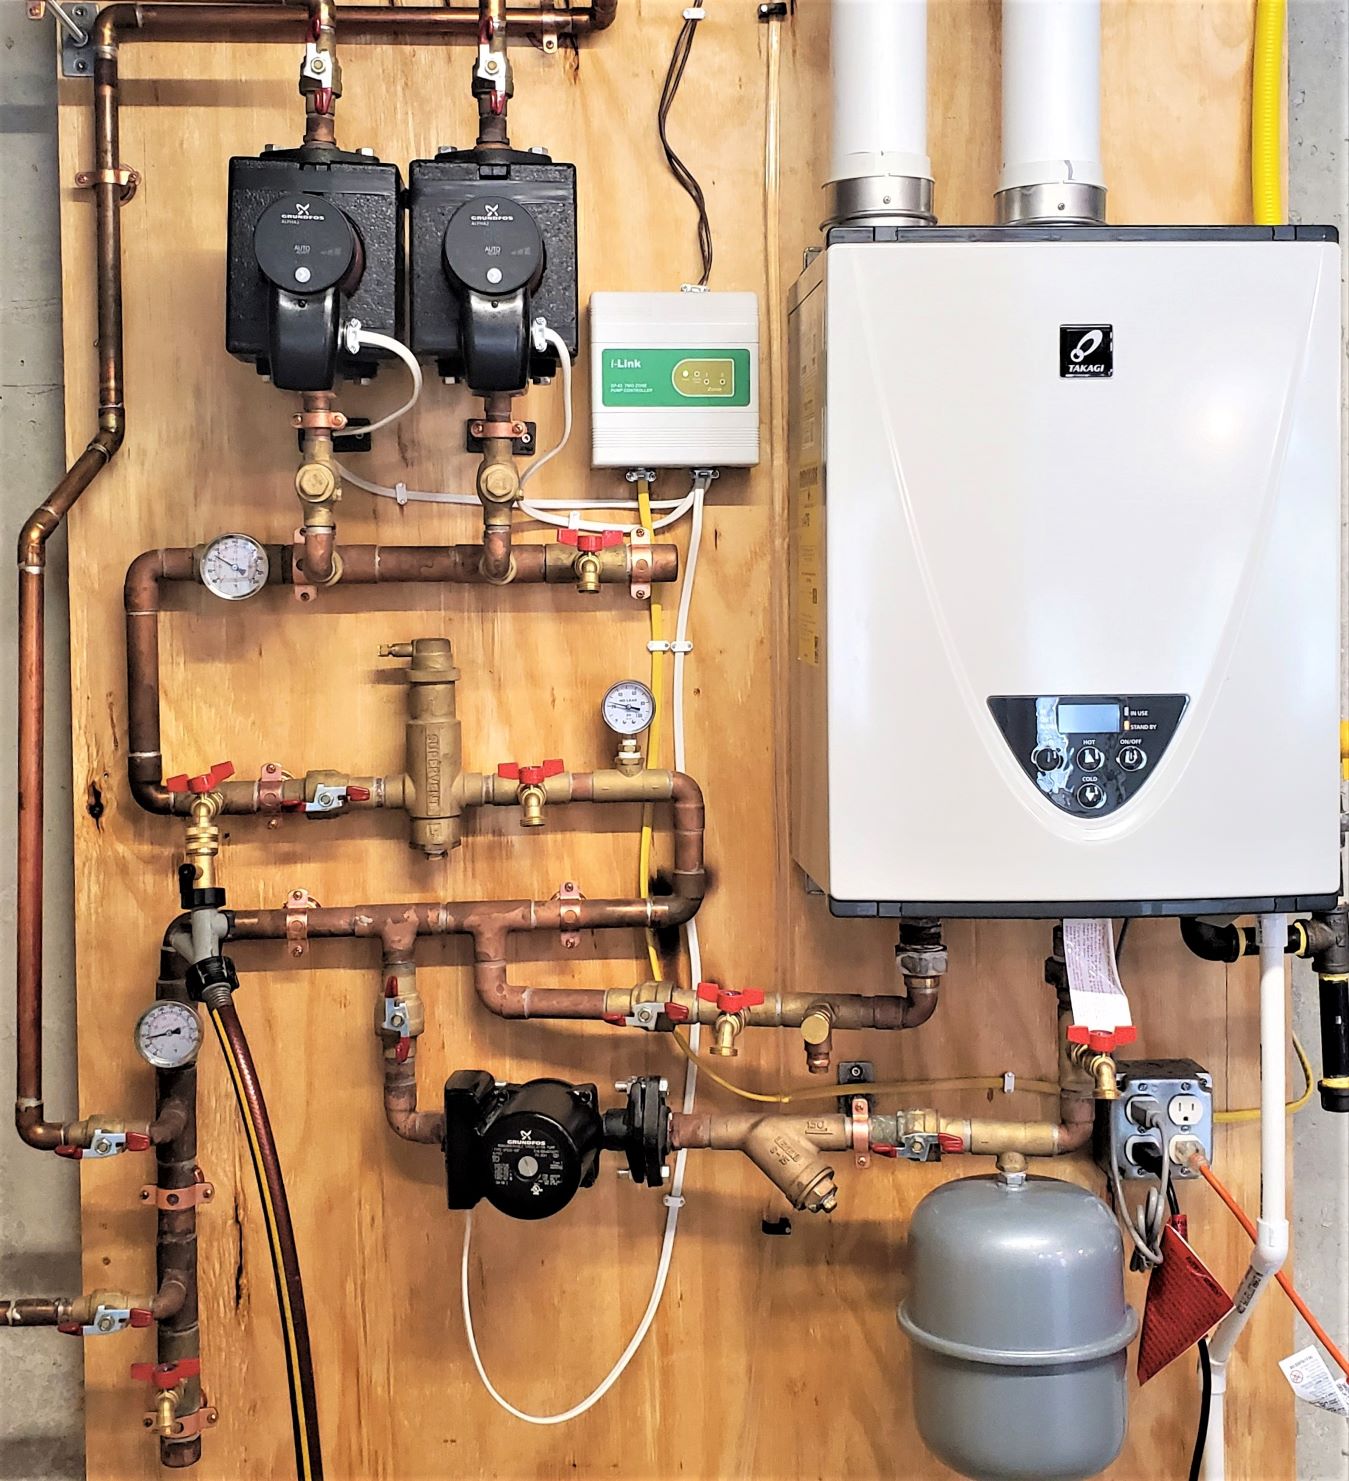
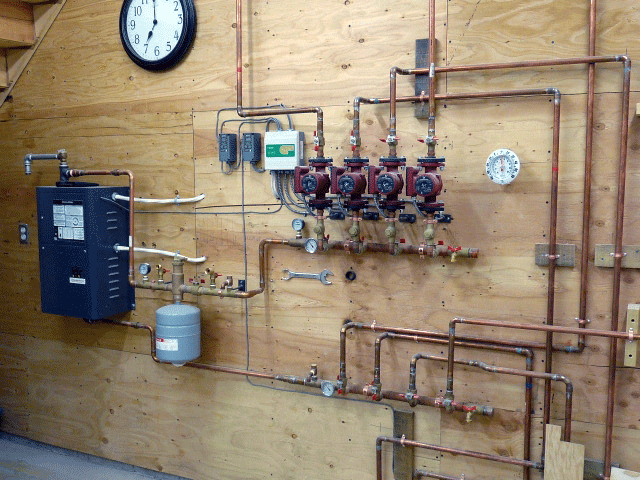
A heat source like an electric boiler (the “Electro” brand boiler shown above, for example) can be thermostatically controlled very much like a conventional tank-type water heater to send low “radiant floor” temperature water (120-135-degrees) to the floor. However, if you are using a conventional boiler (185-degree water) for a heat source, a mixing valve is required.
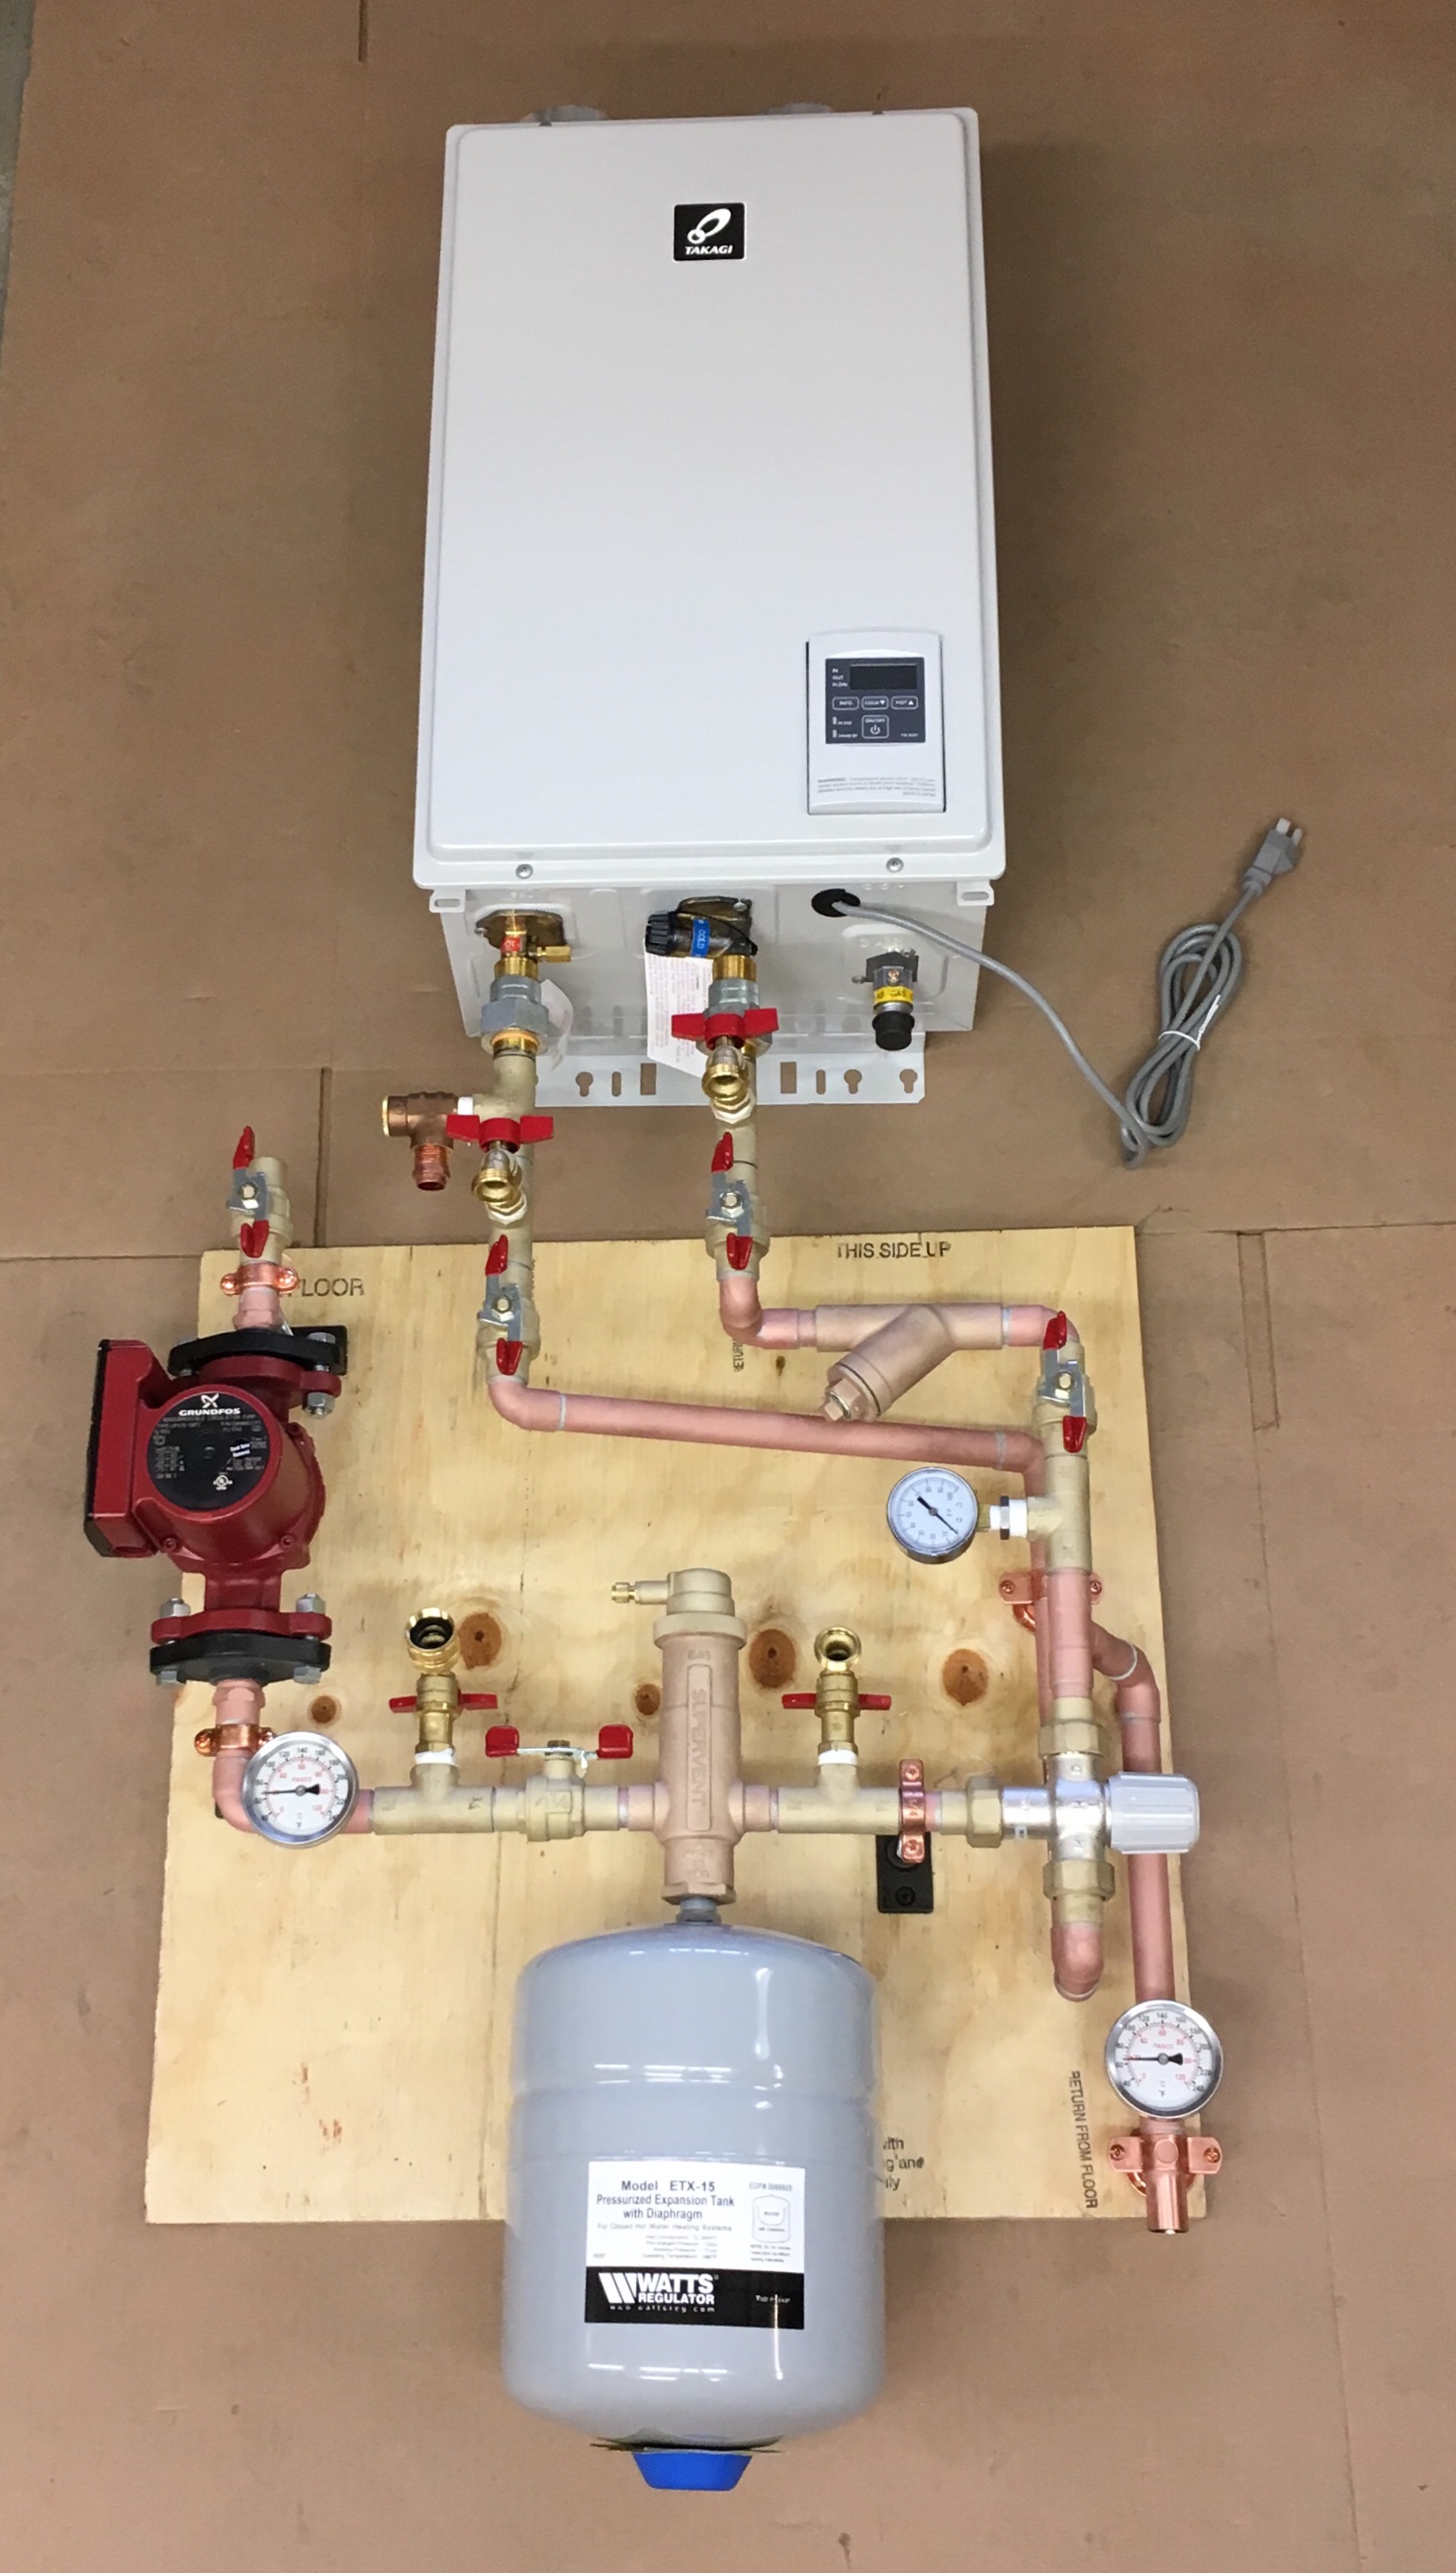
“Radiant Ready” Closed Systems
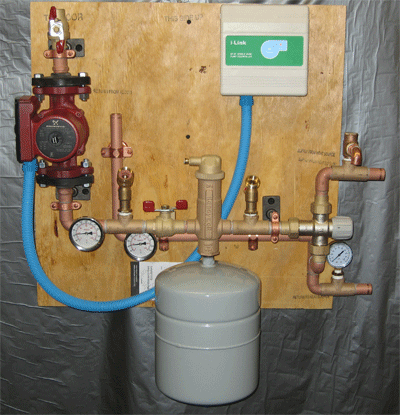
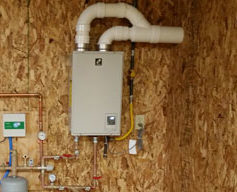
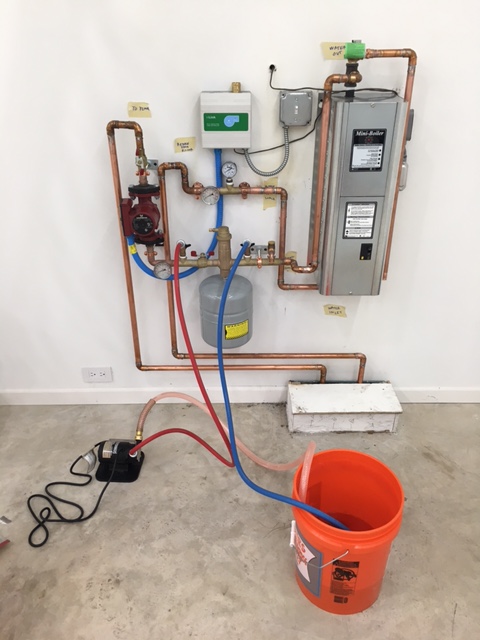
The photo above is our “Radiant Ready A/T” single zone Closed System for use with an on-demand water heater. This pre-assembled panel system comes right out of the box just as you see it here, including pump, pre-wired controller, expansion tank, air eliminator, in-line thermometers, and various gauges and valves. The entire package is pressure tested against leaks and as few as four solder connections can tie it into your system.
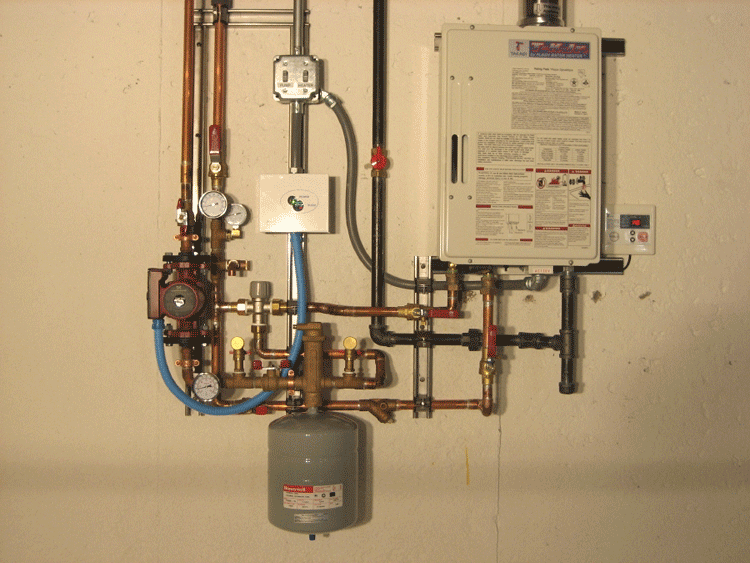
This customer chose to use Unistrut channel to mount his “Closed” Radiant Ready system instead of the plywood board included in the kit, but the result is the same — a clean, compact, beautiful do-it-yourself installation. Note the addition of a mixing valve (the silver, three-way valve with the gray knob) to this system. This gives the customer a more precise control of the system’s water temperature.
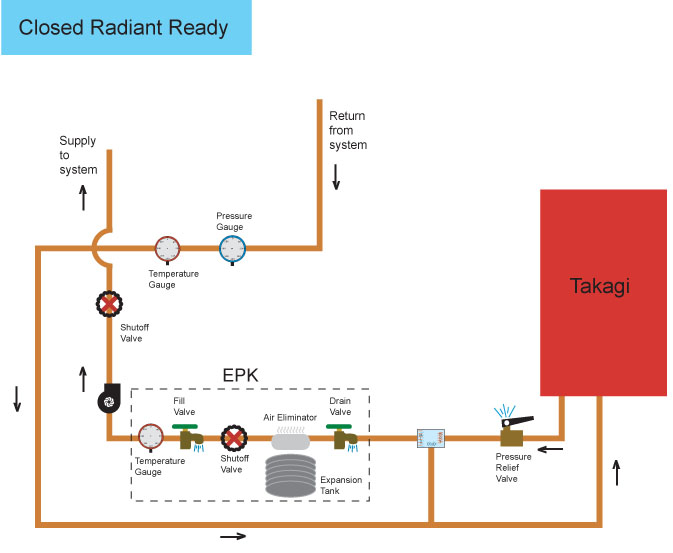
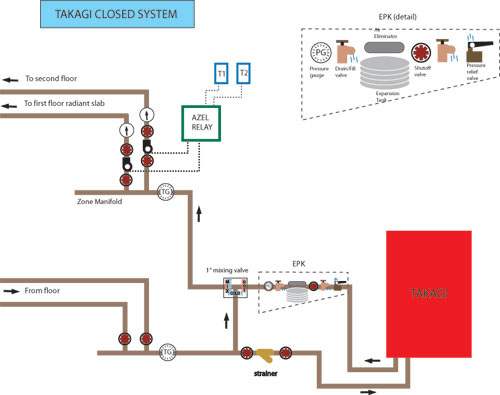
A multi-zone system using an on-demand heater is configured according to the schematic below.
Since most conventional boilers are designed to produce super-hot water (185-degrees), Radiant Floor Company builds what we call “split” manifolds for multiple zone “closed” systems that use radiant floor heat in combination with standard baseboard radiators, fan coils, cast iron radiators, or any other hydronic heating device that requires super-hot temperatures.
A mixing valve is pre-installed in this type of manifold. The baseboard or cast iron radiator zones, for example, receive super-hot water straight from the heat source. The much cooler radiant floor zones receive tempered water from the “mix” port of the mixing valve. The schematic below illustrates this approach.
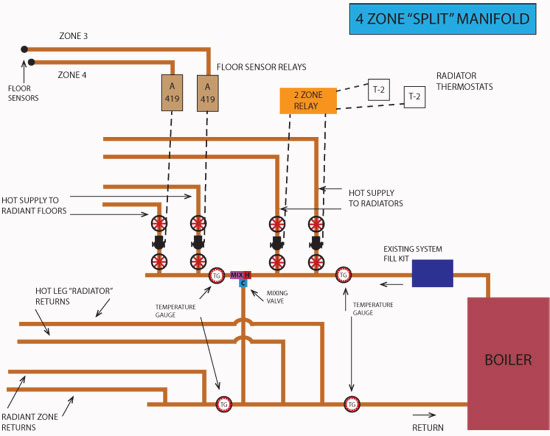
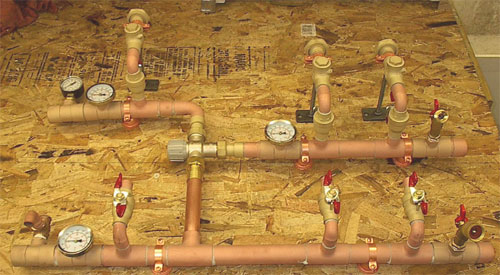
In the above example, the single, hotter baseboard radiator return line enters the manifold AFTER the so-called “cold” supply pipe to the mixing valve. In this way, the two cooler radiant floor returns (coming into the manifold BEFORE that “cold” pipe) can provide ideal tempering water.
Radiant Floor Company can customize a Zone Manifold to suit any application. In this case, one leg on the right side of the manifold feeds a baseboard zone with straight 180-degree boiler water. The two legs to the left of the mixing valve supply the radiant tubing with 125-degree water.
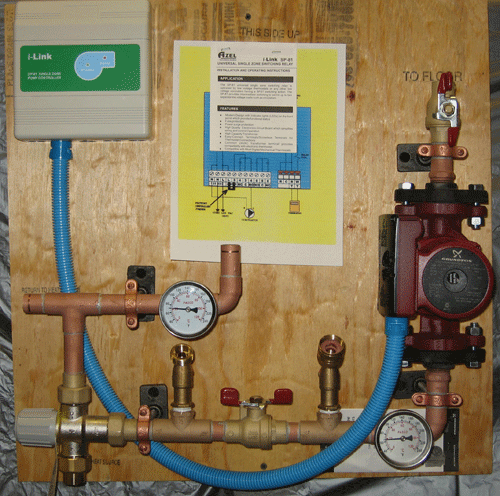
For a single radiant zone coming off an existing, conventional boiler, this “Radiant Ready J” model (above) includes a mixing valve to temper the 180-degree boiler water down to the much lower 120-135 degree range, ideal for in-floor systems.
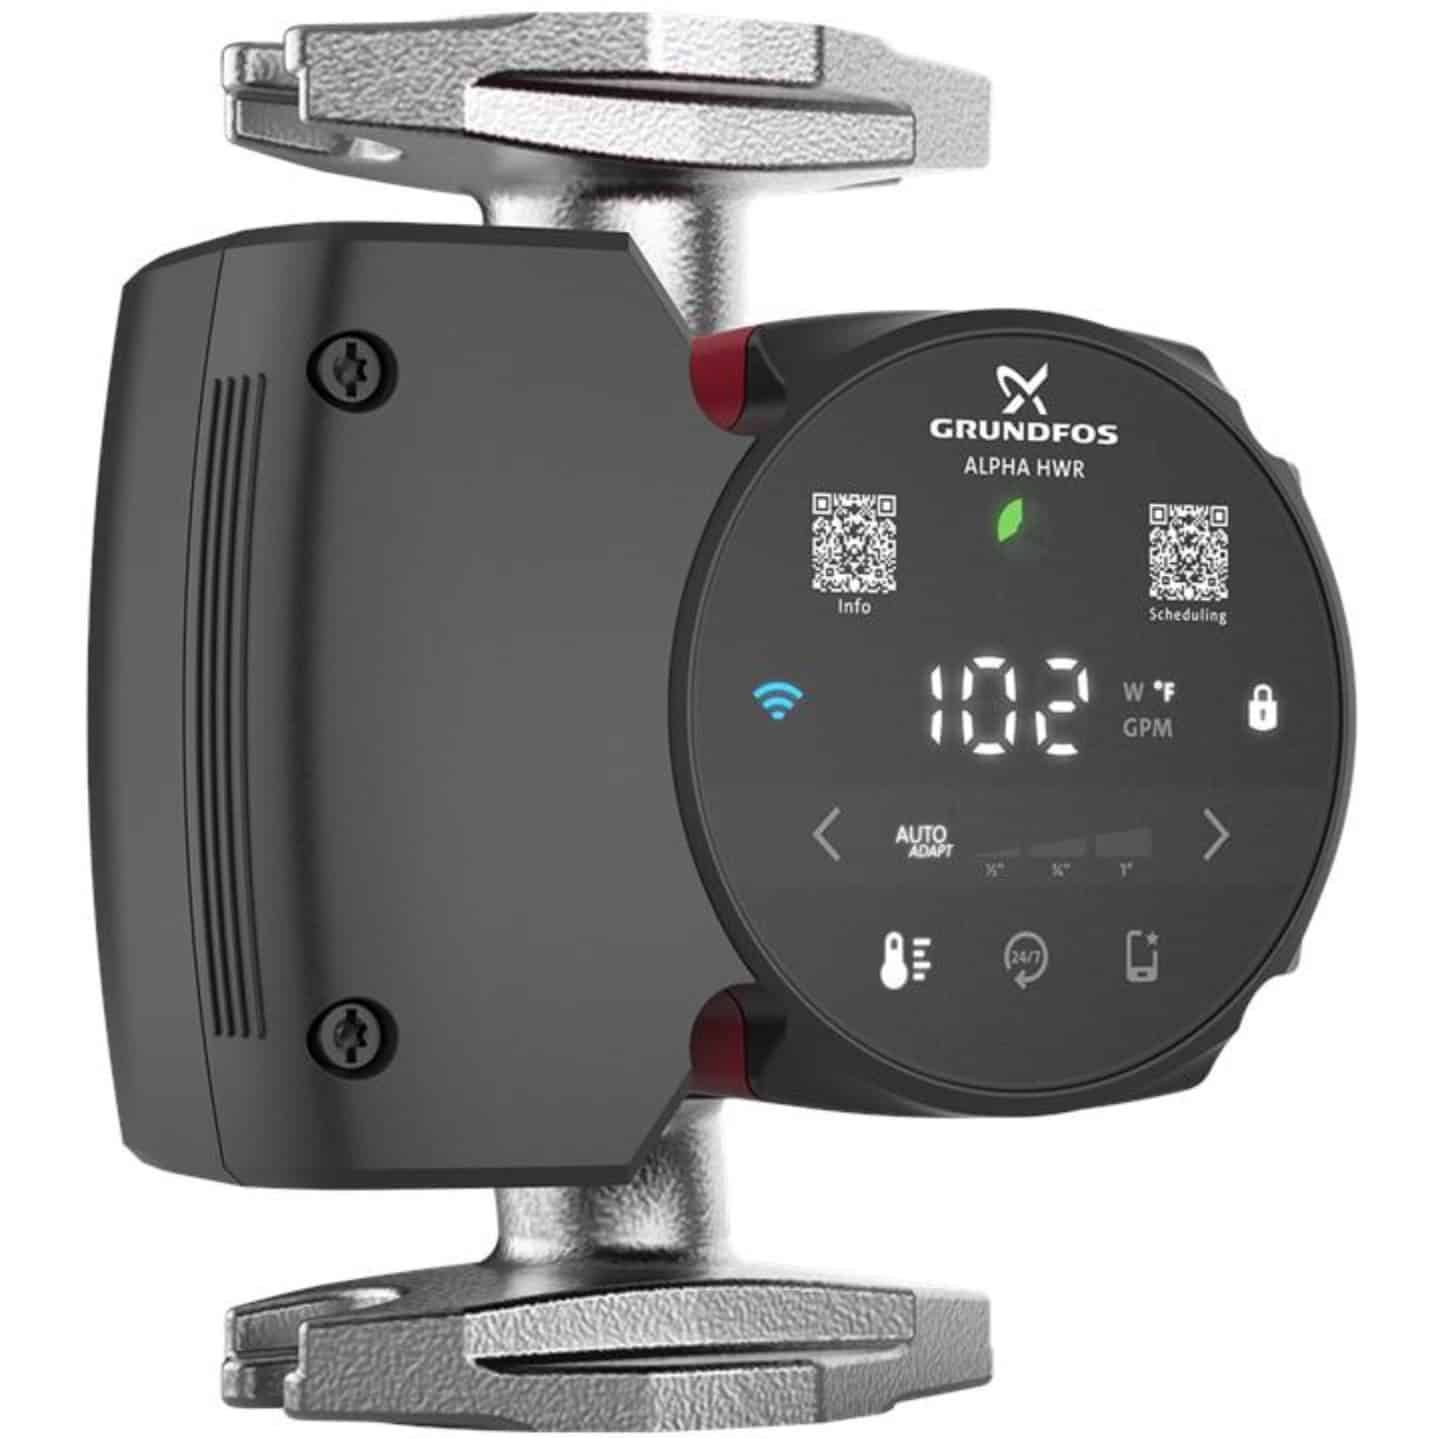
The ALPHA Circulator Pump
Several years ago, when Grundfos introduced the revolutionary “ALPHA” series of hydronic circulators to the US market, we were amazed by two things: 1) the incredible efficiency and energy saving potential of the ALPHA, and 2) by their high cost.
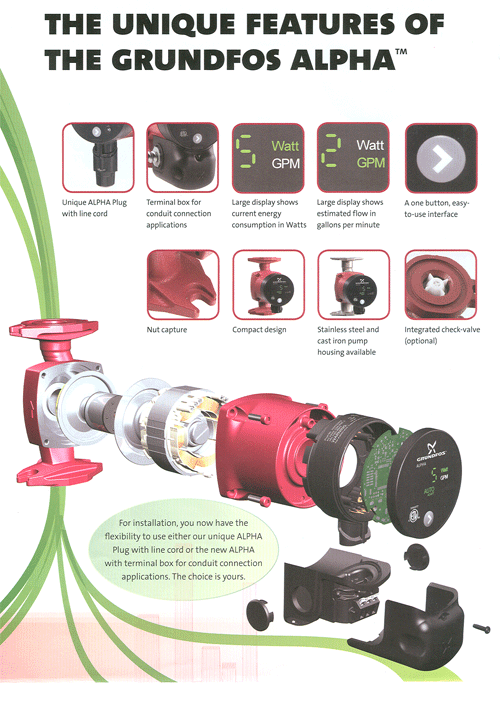
Nevertheless, we were excited enough to invest in several ALPHA pumps for testing purposes and we’re convinced that, if anything, the Grundfos estimates on cost savings are conservative. Now, years later, customer feedback has confirmed that ALPHA’s incredible performance and long-term savings justifies their cost. As a result, we incorporate ALPHA circulators into our radiant system designs whenever possible so our customers can enjoy 50-75% cost savings while running their pumps.
High Volume Systems
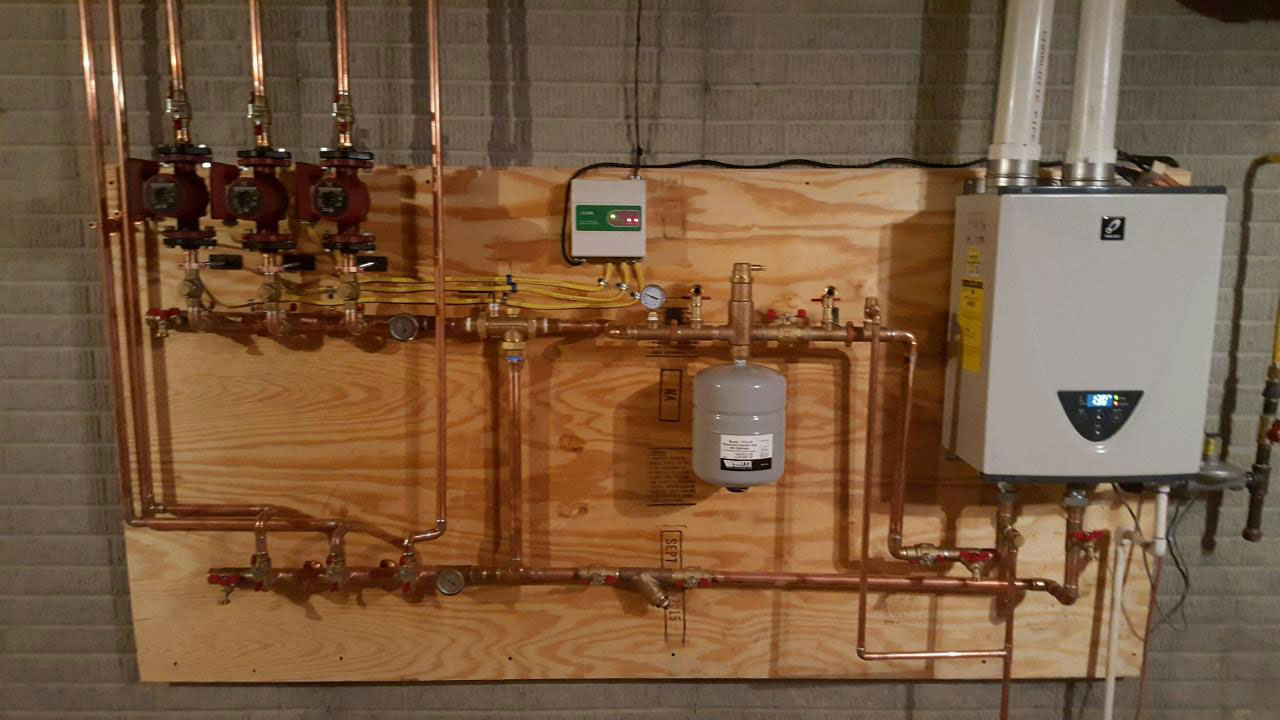
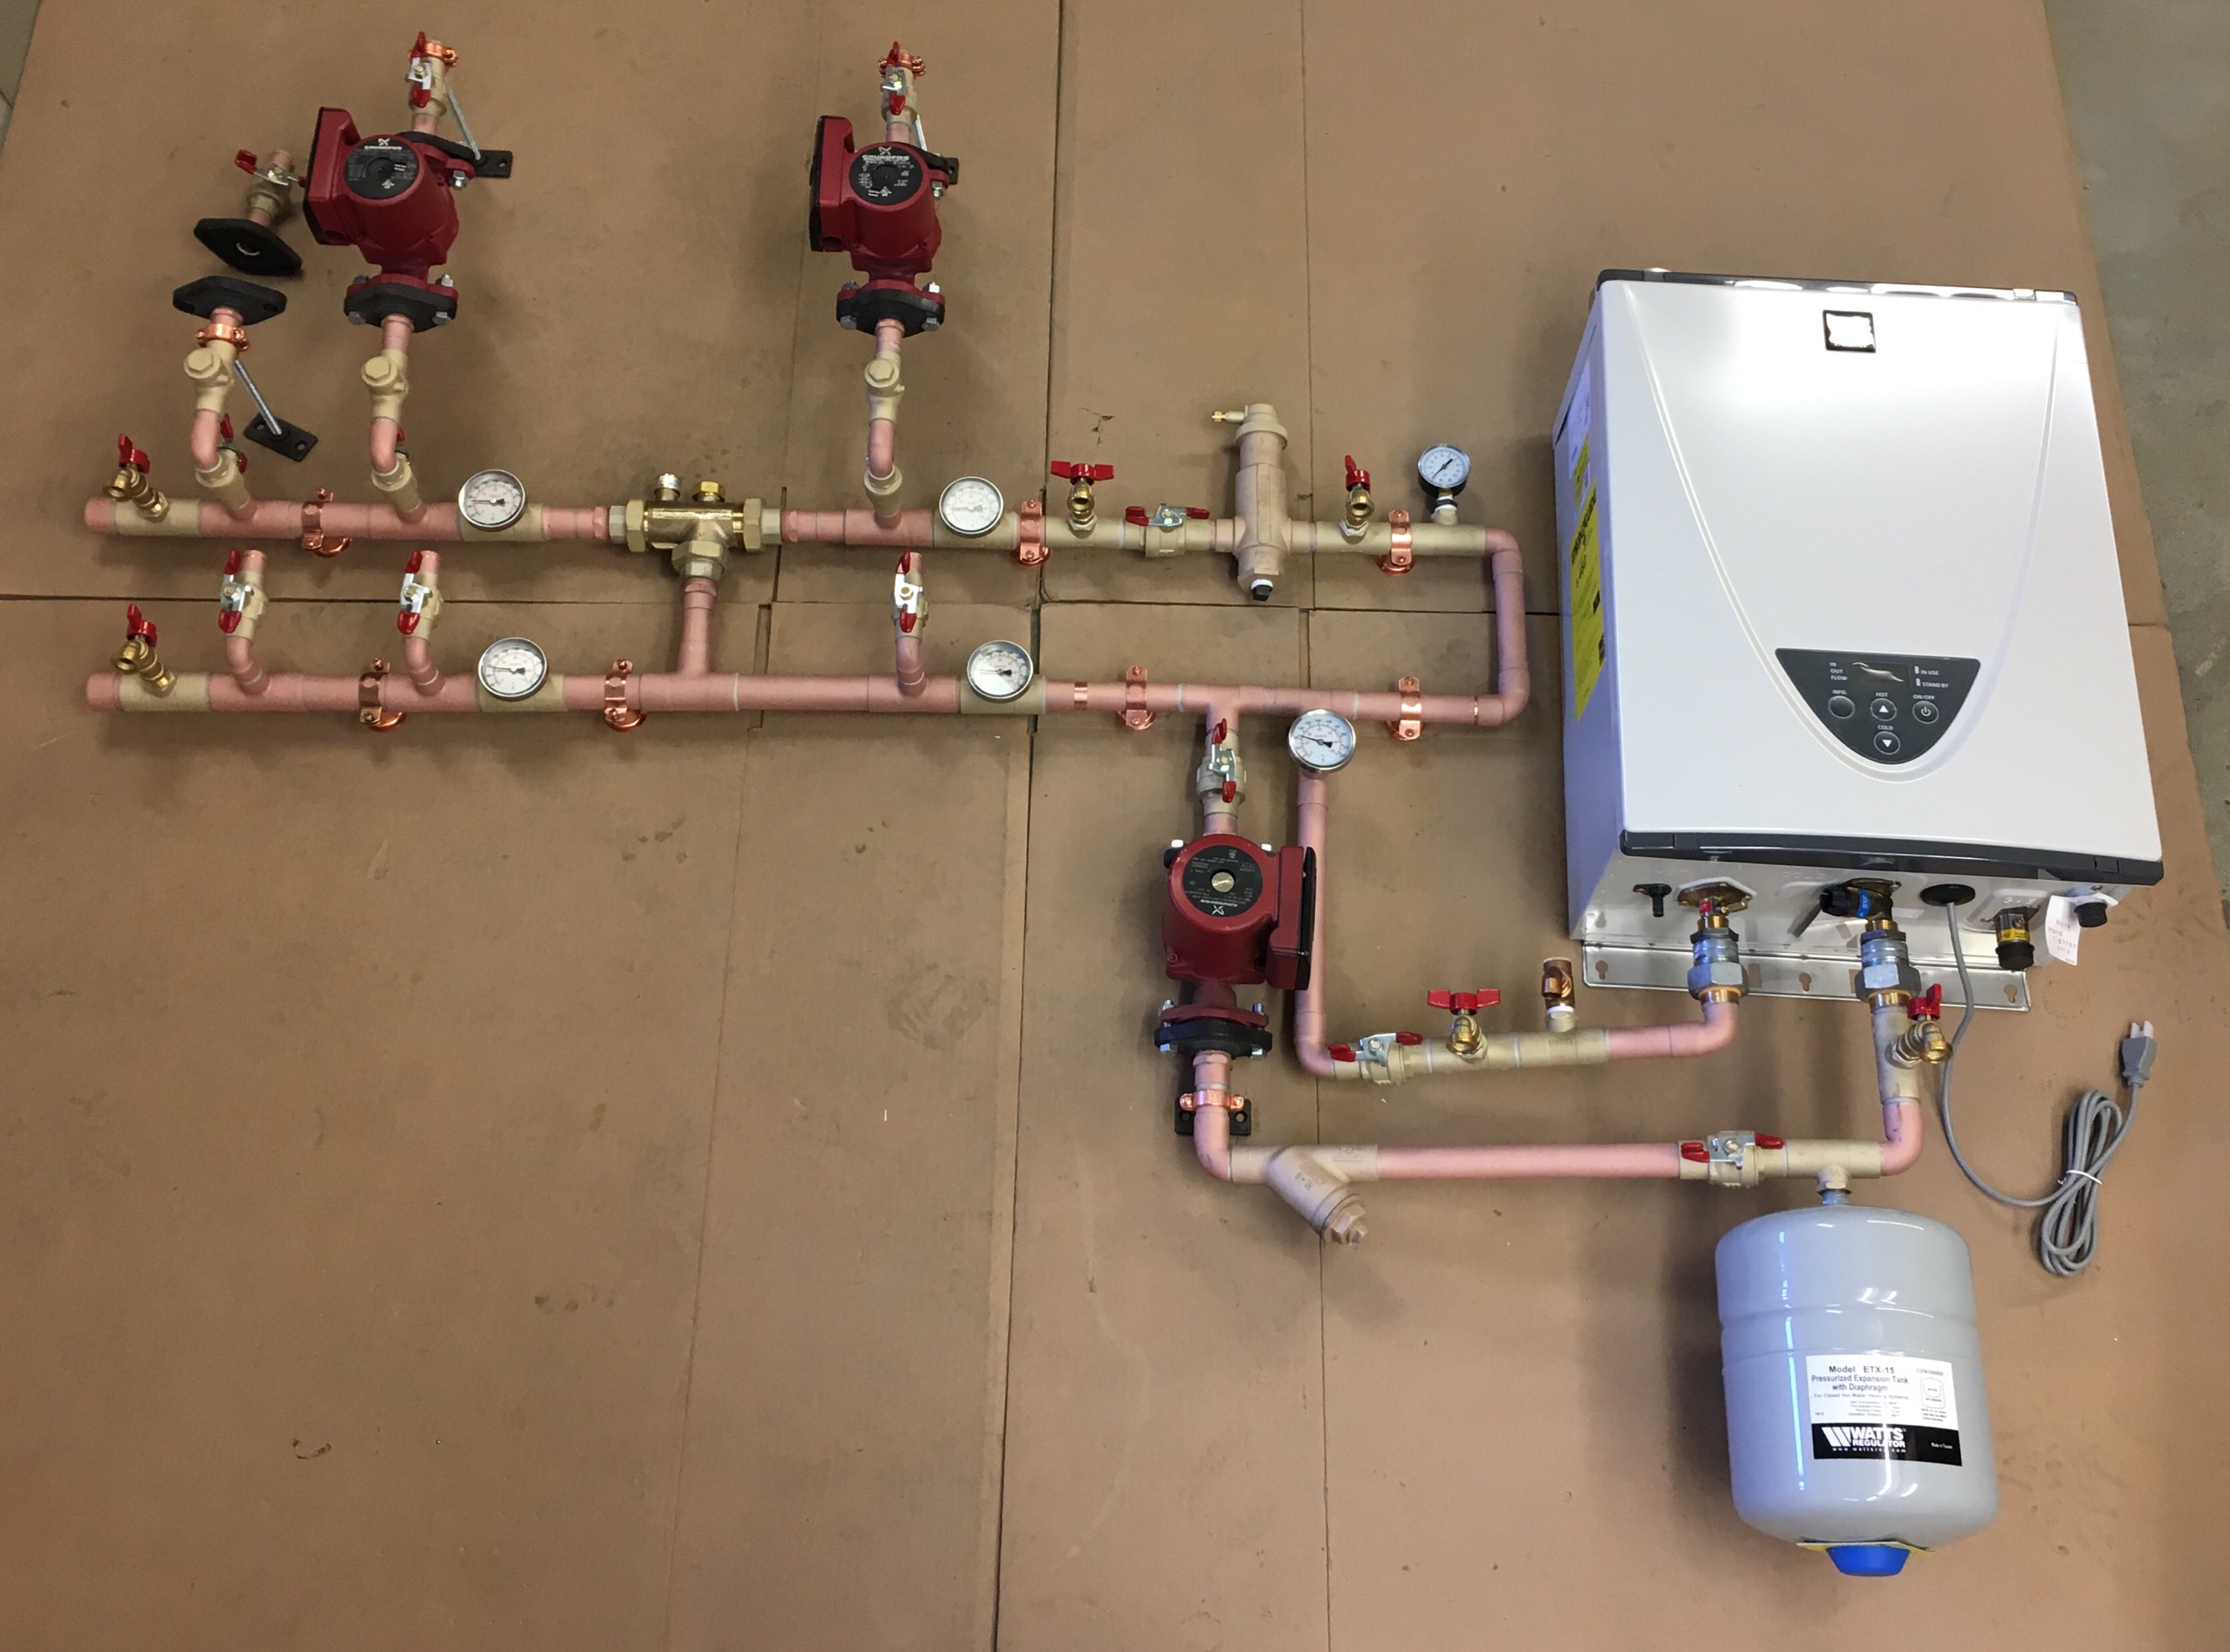
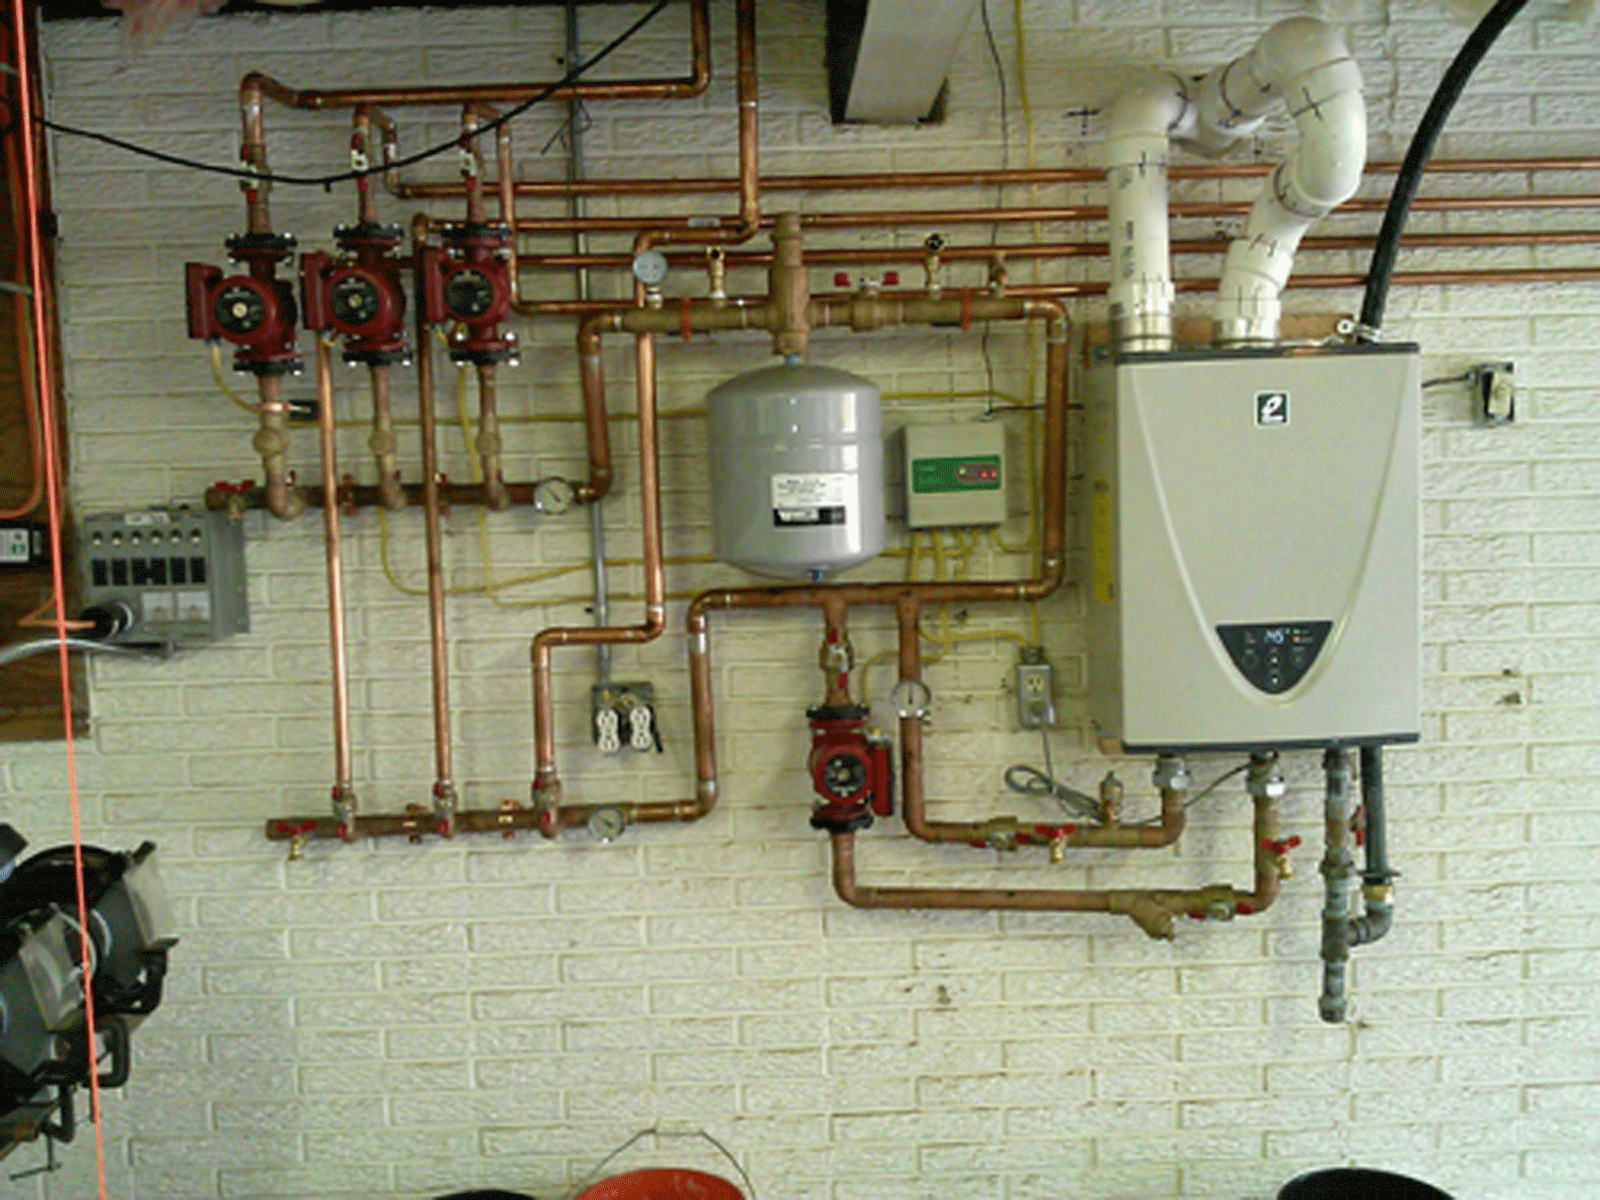
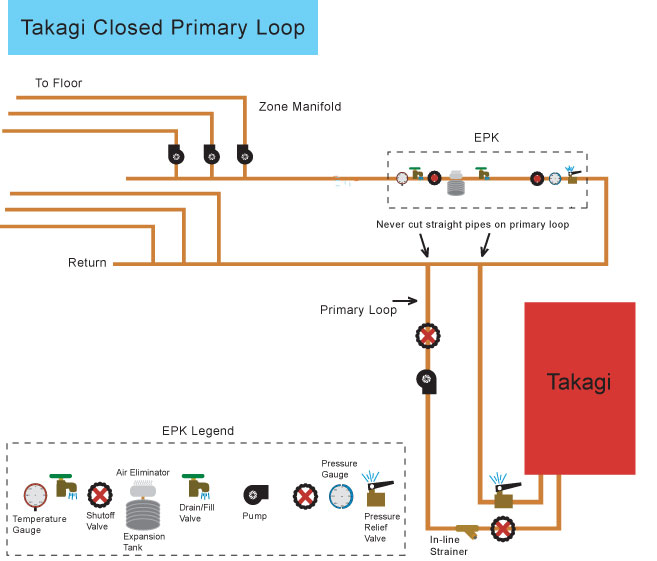
Very large radiant systems require Primary/Secondary plumbing. If you’re interested in the fine details of this plumbing approach, you can find more information in the Heat Sources / On-demand Water Heaters / Primary/Secondary plumbing section of this website. The photo below illustrates a beautiful, real-world application of this method.
Using an Outdoor, or Indoor, Wood or Pellet Boiler With a Closed System
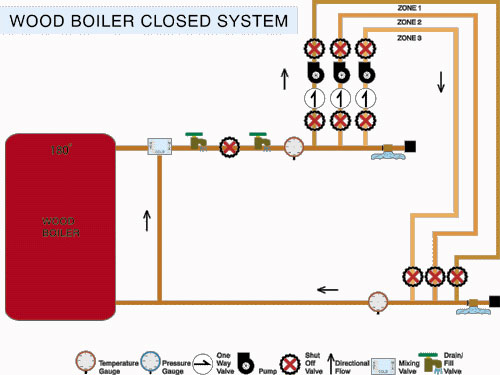
Many customers, especially in rural areas, are installing wood product boilers (cordwood or pellets) and using them in conjunction with radiant floor heating. Normally, these boilers, via a heat exchanger, are plumbed into a storage/back-up tank that can take over the task of heating the water when the winter fatigued homeowner flies off to the Caribbean and becomes unavailable to throw wood into the boiler.
If you have such a boiler, and for whatever reason need to use anti-freeze in the radiant floor system, the following schematic should be very helpful.
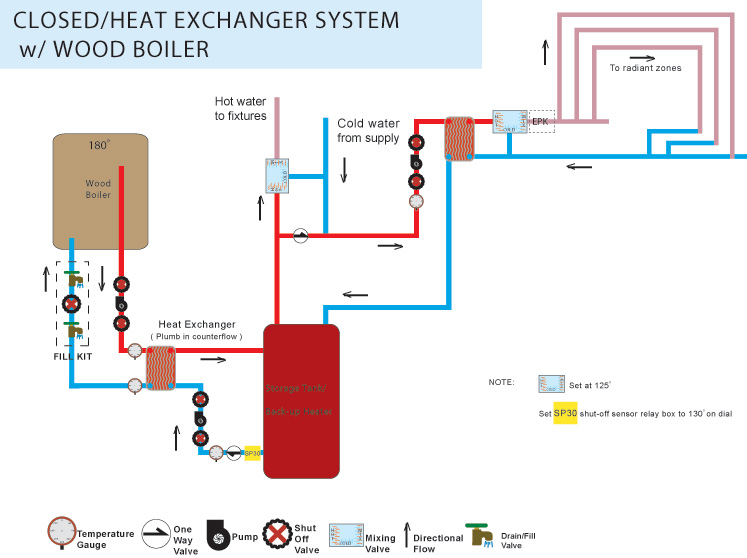
Some wood/pellet boilers are either multi-fuel systems (i.e. they can burn wood and gas or oil) or they have a built-in heat exchanger coil to supply domestic hot water. With this style of boiler, the separate storage/back-up tank is not needed and the radiant floor can be run directly from the boiler.
But normally, the wood boiler is plumbed to a heat exchanger (see drawing above). As you can see, this allows the boiler to heat a tank of potable water, which in turn can provide domestic hot water AND floor heating (in an “open” or “closed” configuration).
The water from the boiler to this heat exchanger flows 24 hours a day in a closed loop, making the heat exchanger “continuously active” (i.e. always hot). Whenever needed, the storage tank draws heat from the heat exchanger and maintains a constant tank temperature. The advantages of a continuously active heat exchanger loop are twofold:
- the insulated pipe from the wood boiler to the house can be buried in a shallow trench (normally about 1 ft.), saving a lot of labor and/or expensive excavation costs (obviously, with constantly circulating hot water in the supply and return lines, freezing is impossible, even in a trench well above the frost line), and:
- by keeping the water in the boiler constantly circulating, stratification is eliminated. In other words, without constant flow through the boiler, the water at the top of the water jacket gets VERY hot, and the water at the bottom stays much cooler. And since some wood boiler models contain hundreds of gallons, 50% of the water in the boiler could be 185-degrees (the temperature at which the boiler damper sensor shuts off the air supply and sends the boiler into resting mode) and the other 50% could be considerably cooler.
This means, in essence, that a boiler sized to provide X number of BTU’s of heating capacity is now providing considerably less than its design rating. Because when one of the heating zones calls for heat, a circulator pump comes on, water again flows through the boiler stirring the hotter and cooler water together, and suddenly, 185-degree water becomes 145-degree water. This can really matter in a marginally sized system.
So, the point is, if you want to run a radiant system directly off your wood boiler (i.e. minus the continuously active heat exchanger), always bury your supply and return pipes below the frost line. As explained above, the water to and from your house will only be flowing when a radiant zone calls for heat. And because many outdoor wood boilers are 30 to 100 feet away from the home, a lot of water can be sitting in a cold (though admittedly insulated) trench for a long time. If that trench is above the frost line, you could have serious trouble.
Filling & Purging the Closed System
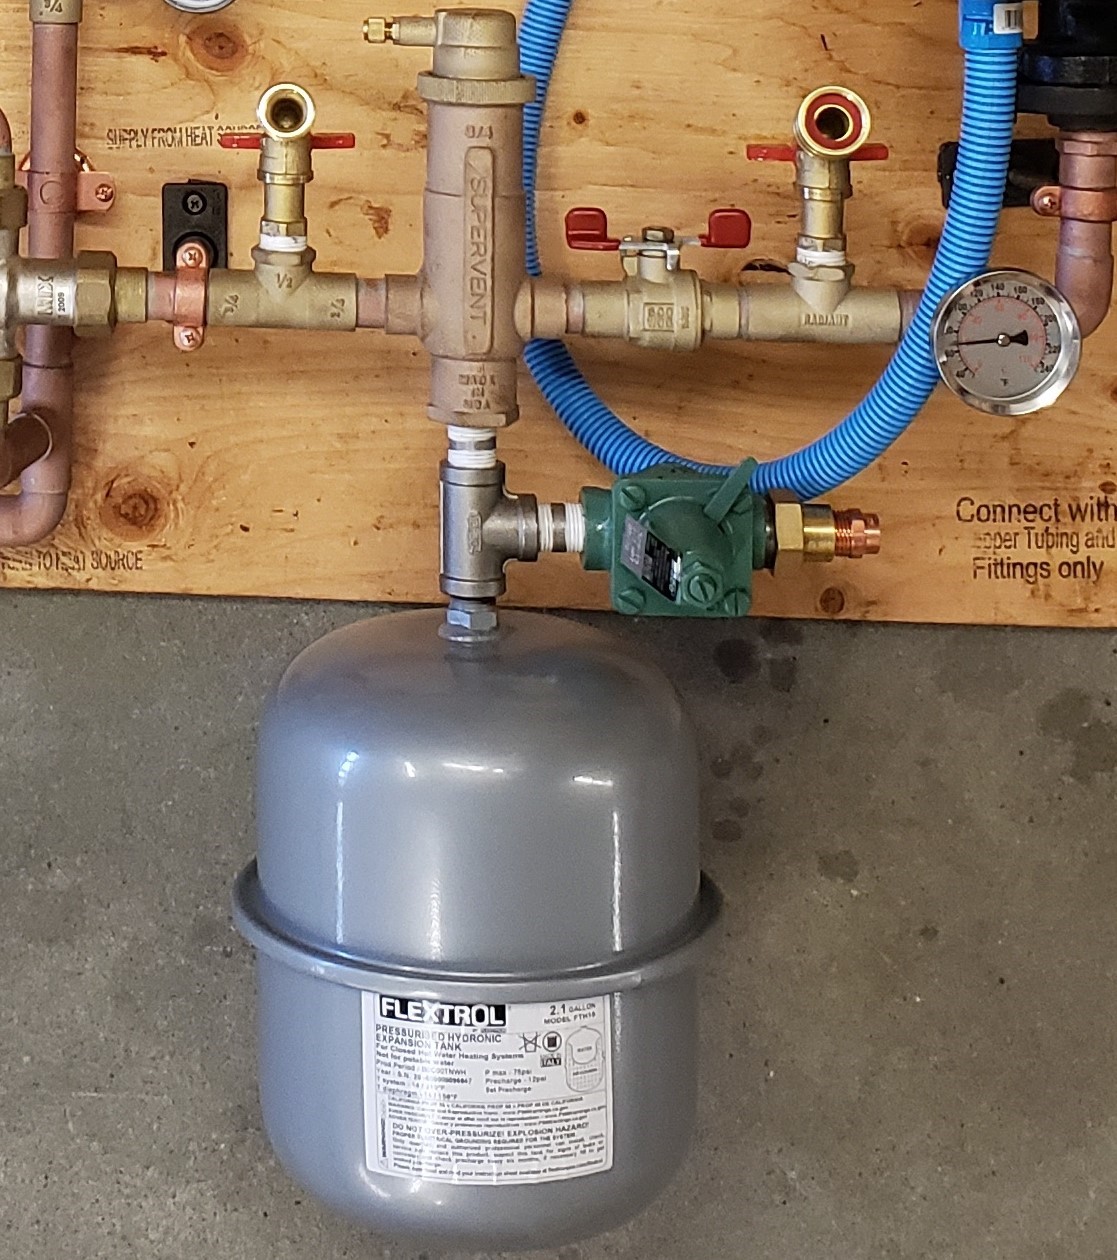
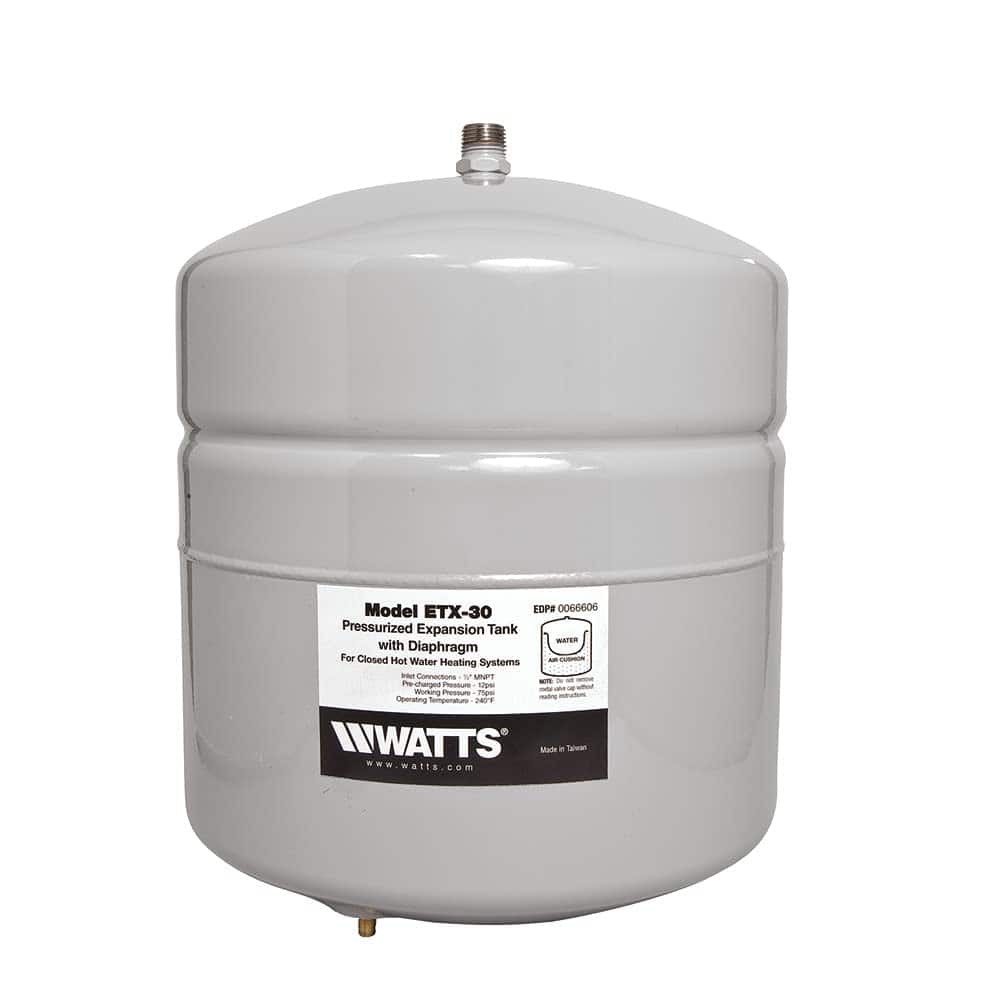
Once a closed system has been installed, it needs filling, normally with an anti-freeze mix (non-toxic propylene glycol NOT poisonous automotive ethylene glycol, as mentioned above). The plumbing package used for this process is called an Expansion and Purge Kit (EPK). The expansion part is simply a small metal tank with an internal butyl rubber bladder that acts as a sort of shock absorber for the radiant floor system. Water expands when heated. The expansion tank absorbs that expansion. Other than screwing the tank into the bottom of the air eliminator (or in a few cases, somewhere else in the plumbing system), the installer can ignore it.
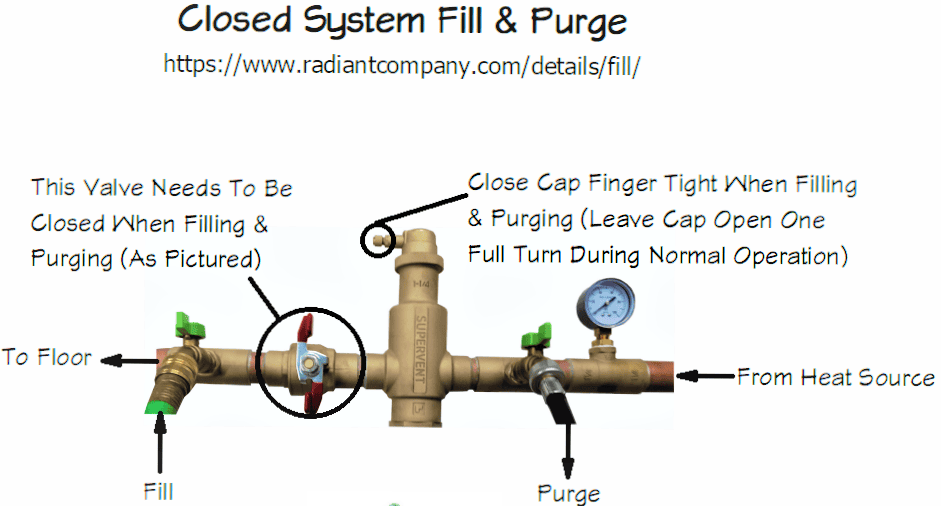
The ”purge” (and fill) part of the kit is more hands on, and all the valves in the EPK are illustrated in the photo below.
Note: For a video detailing the process of using the EPK valves, three hoses, and a pump, follow this link: https://www.radiantcompany.com/details/fill/
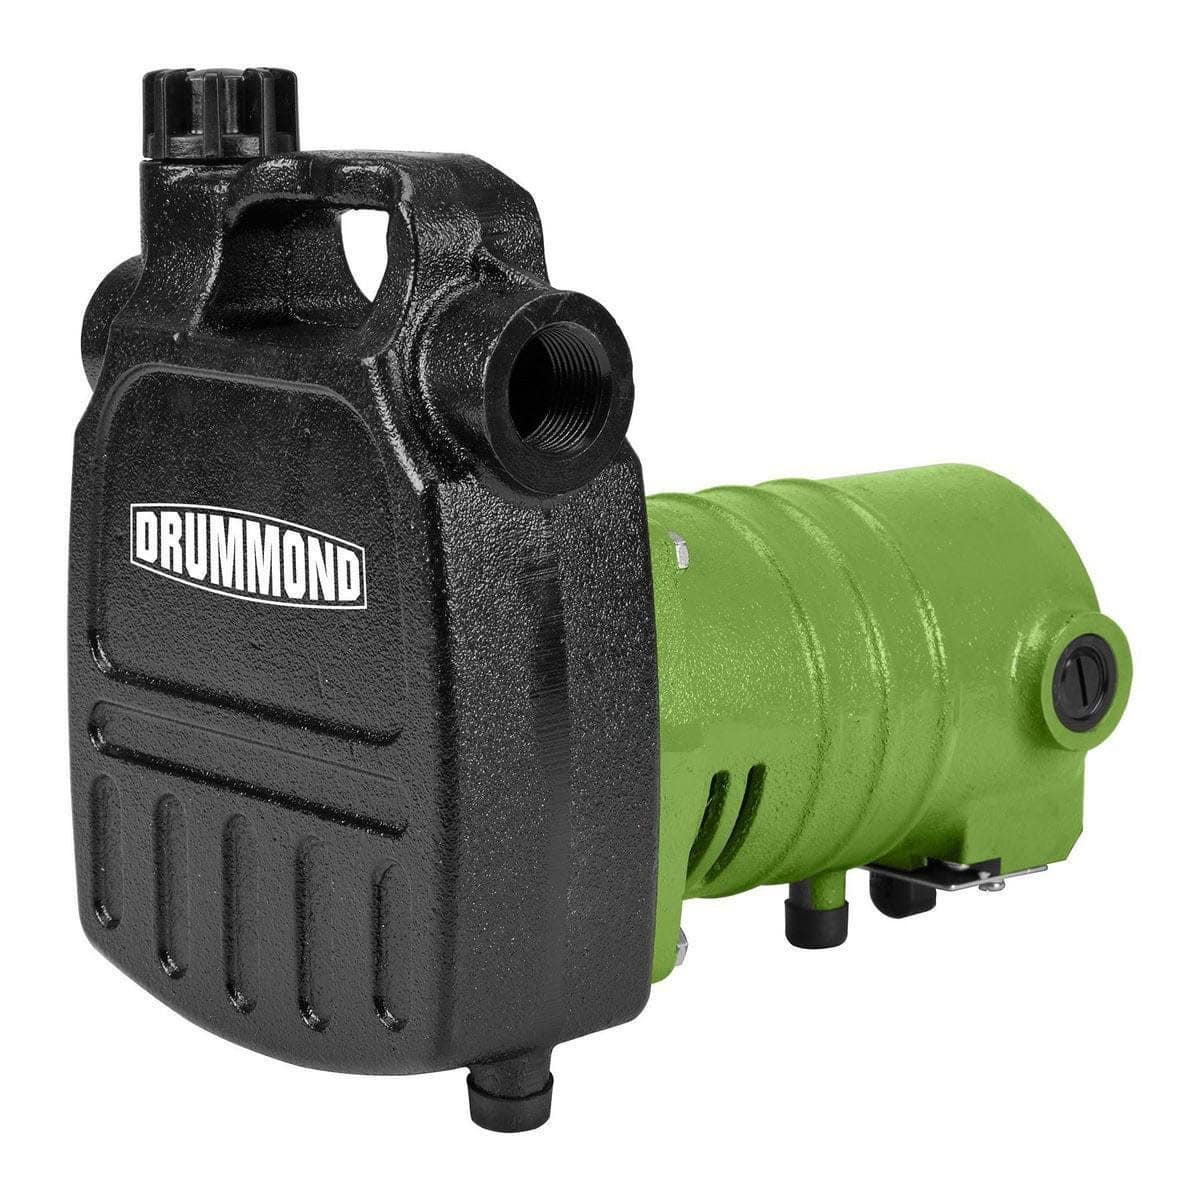
The recommended pump-type is a utility transfer pump — NOT a common (and too weak) sump pump. Please take this advice when it comes to the fill and purge process. By the way, that same utility transfer pump could also be used for the yearly “backflushing” of an on-demand water heater if that is your heat source.
We suggest a powerful utility pump like the Wayne EC-50, or the Wayne PC-4, or an equivalent pump like the Utilitech .5 HP Cast Iron Transfer Pump, all of which can generate up to 45-psi.
The following link https://www.waynepumps.com/solution-center/utility-pumps-transfer/pc4 details the specifications for the Wayne PC4, for example.
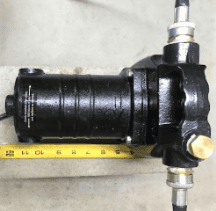
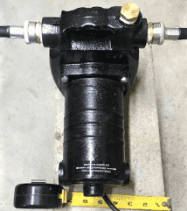
There are many brands, and the two photos below will give you some notion of size and what to look for in a 1/2 HP utility transfer pump.
Purging Procedure Photos
For illustration purposes, the following photos show how some of our customers have “set-up” for the “purge and fill” process.
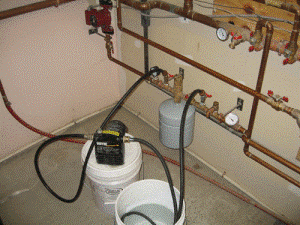
Notice the “circular” nature of the “fill and purge” procedure.
Hose #1 draws fluid from the 5-gallon bucket and into the pump. The pump discharges that fluid into hose #2 and into the “fill” valve of the EPK. It’s a little hard to see, but the ball valve between the two EPK valves is closed, forcing the incoming fluid left and toward the red circulating pump, then through that circulator and into the radiant tubing. The fluid then travels through possibly hundreds of feet of tubing, pushing (purging) air before it, back into the EPK, and finally out through hose #3, the second hose in the 5-gallon bucket.
As you can imagine, the water in that bucket becomes a raging froth of bubbling air, and at this point, it’s a good idea to keep the hose “drawing” water from the bucket away from the hose “pushing” air and spurts of water into the bucket. That way you avoid sucking the purged air back into the system. I always use a couple of spring clamps to secure the two hoses to opposite sides of the 5-gallon pail. The draw hose about 1” from the bottom, the hose flowing into the bucket 1” below the surface to help the bubbles gas off quickly.
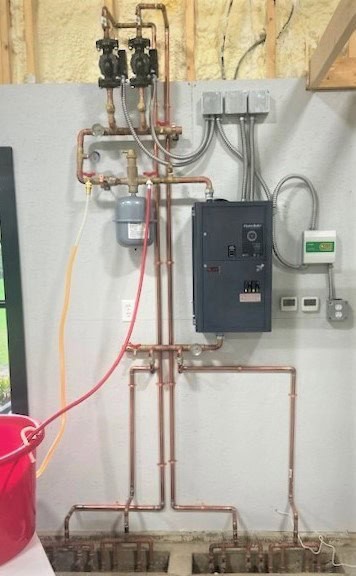
During this “fill and purge” process, it’s always best to FOCUS the fill water as much as possible. If, for example, you have three zones in your radiant floor system, close the ball valves below the pumps for zones #2 and #3, and direct the fluid flow to Zone #1.
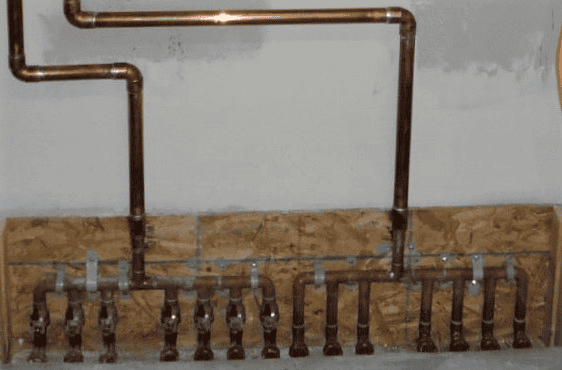
If Zone #1 has multiple circuits of tubing within it, each circuit will also have a ball valve on the supply side of the slab manifold, or, in a multi-circuit floor joist installation, on the supply side of the zone’s ¾” copper header. So, close off all the circuits of Zone #1 except the first one and channel the water into that first circuit. When circuit #1 of Zone #1 has been purged, close off circuit #1 and open circuit #2. Repeat this process for every circuit in every zone.
By the way, for various reasons like local codes, personal preference, etc. some closed systems use plain water instead of anti-freeze. In that scenario, a garden hose from a utility sink faucet or outdoor hose bib works fine. The “purge” hose can run outside to the lawn or down a drain.
Automatic Fill Valve
As mentioned earlier, some closed systems utilize an “auto-fill” valve to avoid the simple but necessary once or twice a season task of “topping off” lost system pressure. Below are examples of where the “Automatic fill valve” (green valve below the expansion tank) would be plumbed into the system. These valves install easily, and naturally, require a constant pressurized water source. The auto-fill can be ordered as an option with your closed system.

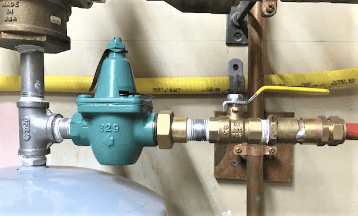
An Automatic fill valve supplies constant water pressure to a closed radiant heating system at a maximum of 10 to 15 psi (see above). The Automatic fill valve, with pre-assembled shut off valve and stainless fittings are easily adaptable to any radiant floor system. Follow this link, https://www.tacocomfort.com/documents/FileLibrary/REV1_BFV_Instruction_Sheet_102-006_HIREZ_030119.pdf for auto fill valve installation & adjustment details/ instructions.
Expansion Tank
Your expansion tank is pre-charged and should not need additional pressure. So, if your system drops below the tank’s factory-set 15 psi, it indicates air still trapped in your tubing. Remember: air in any (hydronic) radiant heating system is the #1 cause of poor system performance. Also remember this link: https://www.radiantcompany.com/details/fill/ for information on filling and purging your closed radiant heating system.
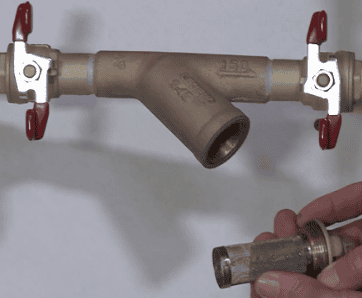
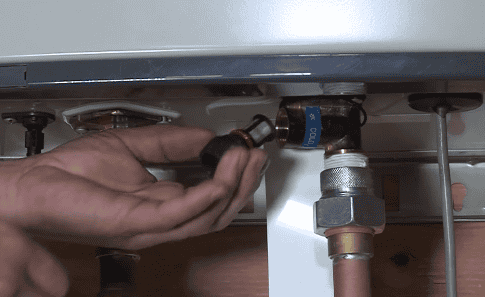
Radiant heating systems require little upkeep beyond maintaining system pressure and occasionally cleaning the strainer and super-fine filter on an on-demand water heater. That filter, by the way, will be dirtiest during initial startup due to things like flux and bits of carbon from soldering, or minor impurities from general handling during installation. In practice, that means checking the filter every couple of days for the first week or so. A simple task, but necessary, and once completed, your system will be “scrubbed” for good.
Follow the above “Filling the closed system” link and scroll down the page for detailed information on cleaning the filter & strainer.
Noise
Any rumbling sounds coming from an on-demand water heater are (most likely) liquid boiling as it passes through the unit’s heat exchanger – often the result of slow fluid movement. Constriction from a dirty filter, or in rare cases, a kink in the tubing or improper piping, and even mineral build up (a result of hard water) in a check valve or mixing valve can cause constriction and result in poor flow. Sometimes, the problem is simply a pump set on the wrong speed. Or, maybe the installer injected undiluted anti-freeze into a closed system, making the fluid too thick and sluggish. Perhaps the heater’s temperature is set too high.
Some or all of these conditions can lead to a noisy heating unit!
Note: After the final filter cleaning following the system’s initial fire-up, you have the option to remove the super-fine filter entirely. It is designed to simply “snap off” from the black cap and its removal will reduce head pressure and minimize any chance of the above mentioned issues.
However, the much less restrictive inline strainer should stay in the system.