During the long, hot days of summer, a solar water heating system generates enormous amounts of heat. At the same time, the demand for hot water is often at its lowest ebb. The combination of these two factors is a condition commonly called “stagnation”.
Basically, stagnation occurs when the solar storage tank heats up to maximum temperature early in the day; movement through the solar collector stops, and the fluid in the system sits under the sun getting hotter and hotter. The result is a high pressure, high temperature condition that can damage the system over time by subjecting it to extremes of expansion and contraction. In addition, when anti-freeze is superheated every day for weeks at a time, it tends to break down and become acidic, thereby transforming into a corrosive substance that circulates through your system slowly damaging its components.
To prevent this, some method of overheating protection is required for those times when there’s simply more hot water capacity than you need. The solutions run the gamut from basic and cheap, but (possibly) clunky, to fully automated, but slightly pricey.
In the basic, but (possibly) clunky, category we suggest:
Cover your panels
Contents
Depending upon how accessible your flat plate panels are, you can cover all or some of your panels with precut sheets of plywood. Obviously, this is easiest with a ground mount or flat roof installation. The plywood not only has to be cut to exactly fit the panel, but it should also be fastened to it somehow to prevent the wind from carrying it away or damaging the panel.
Another option (especially in the case of evacuated tube solar collectors) would be to fashion a custom made shade screen (or tarp) to fit snugly around the flat plate panels or array of tubes.
This approach can be far from clunky as long as the “tarp” isn’t one of those blue or brown poly tarps you find at the hardware store. With the poly tarp you’re limited to a bunch of bungee cords hooked through flimsy grommets to snug the tarp down, and there’s also the potential for damage during periods of high winds. This may be fine for temporary coverage, but debatable for long term use.
The far more elegant, custom made shade screen below costs approx. $40.00 per set of 16 tubes, including hardward, and is illustrated in the following photos.
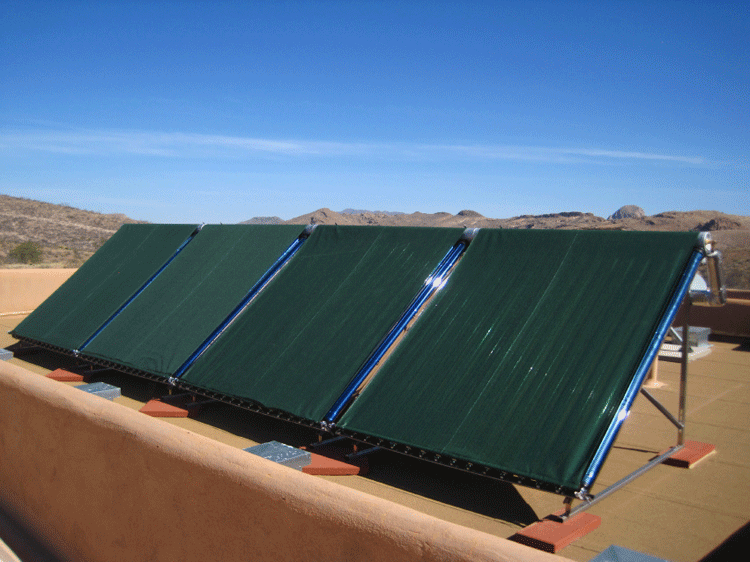
Evacuted tube array shaders
A fully shaded solar thermal heating array. These screens block 90% of the sun’s rays.
In some lower latitude regions, say, roughly below North Carolina, and especially in the southwestern states like Arizona, New Mexico, and Colorado, etc., the solar resources are excellent. It’s quite possible to heat a well-insulated home with a properly sized solar heating system.
This 64-tube array, for example, heats a 2500 sq. ft. radiant slab even during an Arizona high desert winter that frequently sees temperatures in the teens and single digits. The nights are cold, but the sun shines virtually every day in a cloudless western sky.
But, from April through November, this same solar array can generate more hot water than a normal household could possibly use. Even a heat dump package (see below) might have trouble displacing the excess thermal energy.

Partially shaded evacuated tube array
By leaving some of the evacuated tubes uncovered, the array provides domestic hot water during the non-space-heating season.
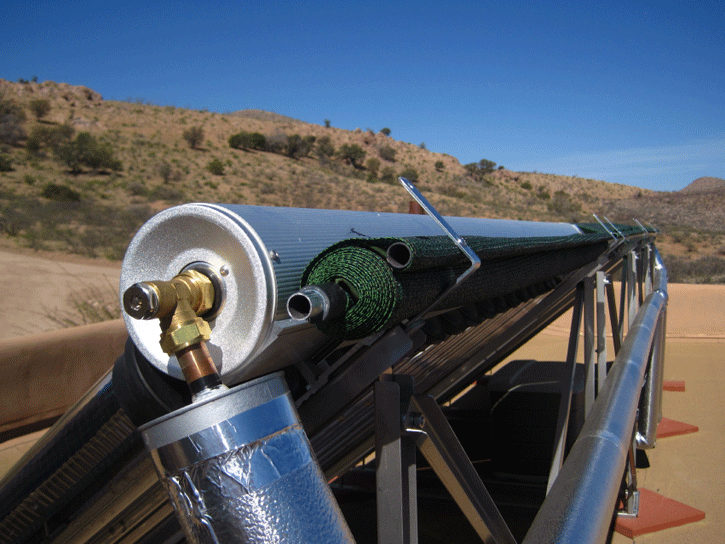
A retracted shade
The neatly coiled retracted shade.
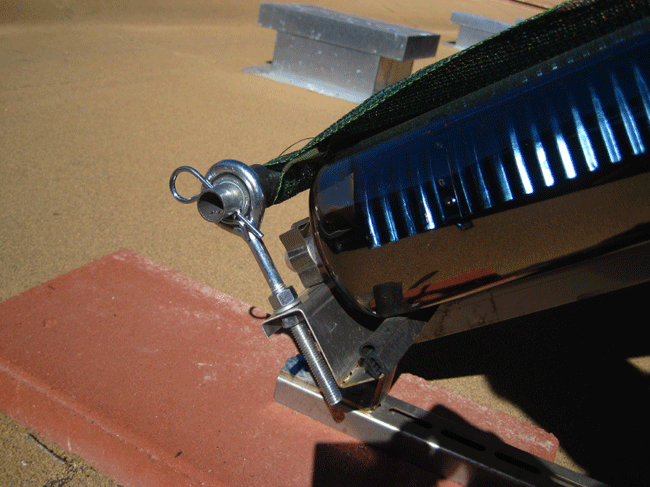
Eyebolts and cotter pins secure the shade’s lower rod (common electrical conduit) to the array’s mounting assembly. And, though not easy to see in the photo, a rubber sleeve is placed over the conduit at the point where the conduit runs through the eyebolt. This prevents the conduit from banging against the eyebolt and creating a racket during periods of high winds.
Of course, both the plywood panel method and the clunky “blue tarp” method presuppose that once you’ve covered a given number of panels, you won’t have to uncover them for several months. Mainly because both of these approaches are such a pain to deal with.
But in the real world, periods of sunny days follow stretches of cloudy days, which follow more sun, then clouds, then more sun. You can see how you may find yourself on the roof covering and uncovering panels a lot more than you’d like to. Or worse, wishing you’d remembered to uncover your panels while standing in a luke warm shower.
Having a custom shade screen makes covering and uncovering easy, should that become necessary.
Shade Screen Assembly Parts List
The following will make (1) shade screen for (1) set of 16 Siedo evacuated tubes:
(2) 4″ x 4″ “L” brackets with one 5/16″ hole drilled into one end (these attach at the top of the vertical brace where the rack attaches to the header),
(1) 72″ x 90″ shade screen, plus 2″ in length for the 2″ hemmed sleeve (for the stick of EMT/conduit) Note: Try unbeatablesales.com for a good price on shade screen. If you own a sewing machine that is capable of sewing through two layers of shade screen, then you can fabricate your own screens. However, you may need or prefer to use the services of a local saddle shop, upholsterer, or awning shop.
(2) 1/2″ x 76″ sticks of EMT/electrical conduit (11/16″ OD)
(2) 3/8″ x 6″ eye-bolts
(4) 3/8″ nuts
(2) 3/8″ lock washers
(2) hitch pins
(2) 5/8″ x 2″ rubber hose (make a slice in the sleeve and place it on the ends of the EMT to prevent it from rattling inside of the eye-bolts).
Now, in the fully automated category we have these options:
Install a Drain-Back system
A drain-back solar system is a non-pressurized volume of water in a closed circuit that, as the name implies, drains back from the panels, down to a storage tank, at the end of every heating cycle.
The advantage of a drain-back system is built-in freeze and overheating protection. Because water only enters the panels after they’ve heated up, and then drains back when the panels cool, freezing is impossible. During the summer when the solar storage tank is fully heated, no water will be sent to the panels to “stagnate”, so no damage can occur from overheating.
However, there are some disadvantages to this type of system. One is the need for a high head pump (and the higher initial cost and higher daily operating costs that go with it) because, unlike a pressurized closed loop system, the pump must be powerful enough to push water from the solar storage tank, against gravity, up to the panels. A pump this size requires 245 watts during operation. As a comparison, a standard solar circulator in a pressurized closed loop system uses just 45 watts.
Also, the solar collector array must be installed at a slight angle. A minimum slope of ¼” per foot must be designed into the support structure to guarantee that all the liquid in the collector drains back to the storage tank. If your solar array is clearly visible from below, this can give your system an “off level” look because, quite simply, the panelsare off level. In addition, if you’re installing panels in a ground mount application, a drain-back system may lack sufficient fall unless your storage tank is well below ground level.
One other limitation worth mentioning about the drain-back approach involves its usefulness during marginal solar gain periods.
With a standard, non-drainback solar setup, the cold make-up water for the home’s domestic hot water supply is fed directly into the solar storage tank. This is because the solar storage tank and the main water heater tank are part of the same pressurized domestic hot water system. The “hot out” from the solar storage tank goes to the “cold in” of the main water heater (remember, the main water heater acts as your back-up system during times of little or no solar gain). This plumbing between the solar storage and the main water heater guarantees that, even during marginal solar days, warm water, or at the very least, room temperature water comes from the solar tank to the main water heater…instead of, say, 45 degree water directly from your well. In this way, any heat available from your solar gets used.
With a drain-back system, heat from the non-pressurized solar tank should only be transferred, via an external heat exchanger, to the main pressurized tank when there’s enough heat available in the solar tank to make the transfer worthwhile.
In other words, only when the water in the solar tank is hotter than the water in the main water heater (i.e. back-up heater) will heat be transferred over. As a result, there will be times (especially during a cloudy winter) when the solar tank is filled with potentially useful, but only semi-warm water.
In this instance, assuming that the tank is well insulated and can hold its heat overnight, another solar day will be required to raise the water temperature further and trigger a heat transfer. In practical terms this means that some days will pass without any contribution from the solar at all as the collectors struggle to bring the tank up to a useful temperature.
Of course, there’s a way to address this problem, but it’s expensive.
A pricey solar storage tank with one or more internal heat exchangers can be used in place of the much less costly plain storage tank with an external heat exchanger.
With this approach, the cold water replenishing the main water heater (i.e. when hot water goes to the house, fresh cold water replaces it) passes through an internal (SS or copper) heat exchanger and is heated either totally or partially before it leaves the solar tank and enters the main water heater. As a result, any heat available in the solar storage tank is transferred to the incoming cold water instead of sitting in the tank waiting for enough sun to trigger a transfer to the main water heater. This prevents the heat gained during lackluster solar days from simply sitting idly in the tank and radiating uselessly out, over time, to the surrounding air (standby loss).
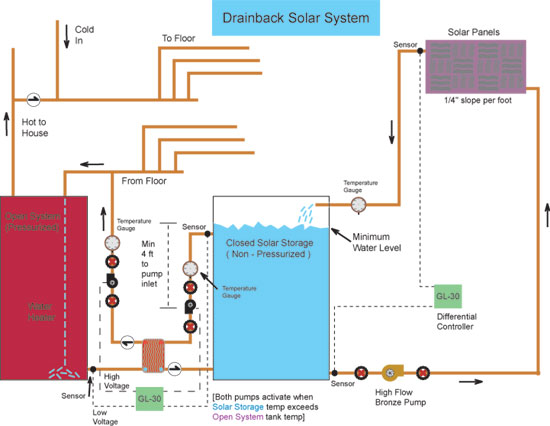
Drainback solar system schematic
Install a Heat Dump Package
The heat dump package is a fully automatic method of diverting excess heat from the collector array to…wherever.
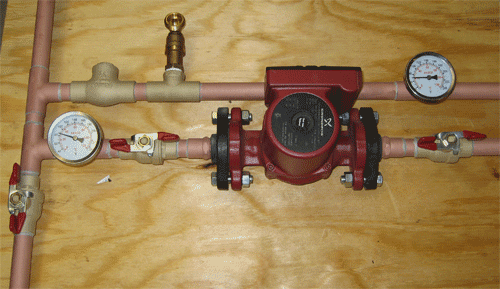
Radiant Company Heat dump package
Strictly speaking, the Heat Dump Package is designed to protect the system from overheating, but the extra heat can also be used to heat a pool, a hot tub, or an insulated below-ground thermal mass to store heat for later use.
But normally, the excess heat is simply poured into the atmosphere via a 60 ft. coil of ¾” soft copper. We use a coil of copper as a “heat exchanger” for several reasons:
1. Copper conducts heat very well.
2. 60 ft. of tubing is a fairly large surface area and will radiant a sufficient amount of BTU’s.
3. The coil costs much less than a “real” stainless steel flat plate heat exchanger.
4. Unlike a standard heat exchanger, only one pump is required to power the heat dump. Normally, one pumps draws heat to the heat exchanger, a second pumps sends it somewhere.
5. The coil is weatherproof, and can be placed anywhere…in the air, underground, or underwater.
The package itself is a type of plumbing configuration called a secondary loop. It is plumbed into the primary collector loop following very specific engineering guidelines. As a result, the secondary loop (i.e. heat dump) does not cause any pressure drop issues in the main collector loop.
The package is sold pre-assembled (see above photo) so the installer merely solders a few connections, powers the relay, and connects a sensor to the storage tank to complete the install.
Once in place, the heat dump protects the solar array by automatically activating when the solar storage tank reaches a designated high limit temperature. During periods of excess heat production, the small circulator pump in the Heat Dump Package will remain on until the temperature in the solar storage tank drops at least one degree (the customer can decide exactly how many degrees) below the high limit set-point. Then, once the solar storage tank is ready to accept more heat, the heat dump shuts off and the solar panels return to the task of heating the storage tank back to the high limit set point.
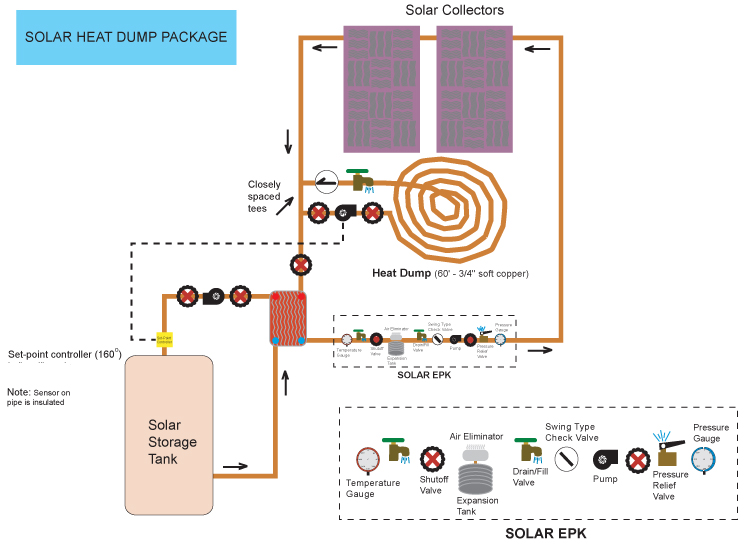
Heat dump schematic
How the Heat Dump Works
It’s important to remember that the Heat Dump Package operates in conjunction with the main solar loop. In other words, the heat dump doesn’t work independently and activate AFTER the solar storage tank reaches its high limit temperature. It activates while the solar tank is gaining temperature. The solar loop and the heat dump loop work together, but only when the heat dump activation temperature is reached (often around 160 degrees). At this point, the heat dump circulator diverts heat to the soft copper “heat exchanger” coil and much cooler fluid is returned to the main collector loop.
This slows down the temperature rise in the solar storage tank.
So, at what temperature should the heat dump activate?
The answer depends on your location. If you have excellent solar exposure and anticipate long hours of cloudless weather (southwest desert), a 140 degree set-point may make sense. Remember, the heat dump still allows some heat to reach the solar heat exchanger. If hot water usage is low and solar gain is high, and you have a low volume storage tank, 140 degrees may be a good point to start dumping excess heat.
On the other hand, intermittent sun, poor exposure, etc. may demand a “get sun while you can” approach. Don’t start dumping heat until you have all you’ll need. Maybe a 160 or even a 180 degree set-point makes sense.
It’s best to experiment with your particular parameters and use a set-point that suits you. As long as the temperature you choose provides you with plenty of hot water, won’t allow your solar storage tank to overheat, or shut down the main system pump (stagnation), or worse, trigger the pressure release valve, it’s right for you.